Earlier this month my daughter Naomi’s school had Teacher Appreciation Week. I volunteer weekly in Naomi’s art class, and I also help out her classroom teacher once a week with things like decorating her classroom, photocopying worksheets, and other small tasks to help things run smoothly. She really needed a better pencil sharpener, and she liked the small manual one I had given Naomi for her desk, so we got her one of those.
Of course I also wanted to crochet her something. Naomi told me her teacher likes apple decorations, but I noticed that she already had a lot of those all over her desk, and I wanted to make her something useful. I searched around for a bookmark pattern that I liked, but couldn’t find anything quite right, so I decided to just make up my own.
I wanted to share it here since school will be ending in a few weeks, in case anyone is looking for a small, simple, easy-to-make gift for their child’s teacher.
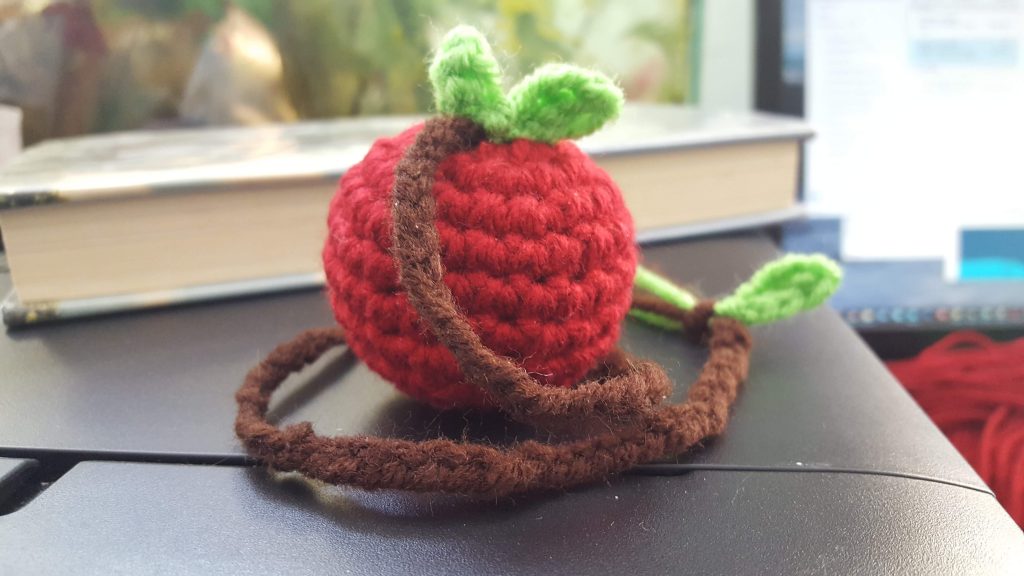
Apple Bookmark
Terms/Abbreviations:
Sc: Single Crochet
St: Stitch
Inc: Increase—2 sc in the same stitch
Dec: Decrease—1 sc across two stitches. I use the invisible decrease method (you can easily find tutorials on YouTube).
Rep: Repeat
Ch: Chain
Sl st: Slip stitch
FO: Fasten off
You will need:
size F/3.75mm hook
yarn in three colors for the apple (MC), leaves (CC1), and stem (CC2) (I used red, green, and brown worsted weight yarn)
yarn needle
stuffing
Apple (MC)
Work in a spiral in continuous rounds
R1: 6sc in magic circle (6 sts)
R2: 2sc into each st (12 sts)
R3: *inc, 1sc* Rep six times (18 sts)
R4: *inc, 2sc* Rep six times (24 sts)
R5-8: 1sc in each st around (24 sts)
R9: *dec, 3sc* Rep six times (18 sts)
Stuff firmly, but do not overstuff (see note below).
R10: *dec, 1sc* Rep six times. (12 sts)
R11: *dec around* Rep six times (6 sts)
FO and leave a long tail. Using the tail, thread a yarn needle and pull the yarn through the center of the apple from top to bottom and vice versa to make the indentations/apple shape. (Note: This did not work so well for my first apple—with less stuffing, the dents were much more visible.) Hide tails inside apple.
Leaf (CC1) (make three or as many as desired)
Ch 4. In the second ch from the hook, sl st. Sc in next ch (third st from hook). Sl st in next ch (fourth st from hook).
FO and weave in ends. Leave a long tail for sewing to the apple and stem.
Sew two leaves to top of apple. Sew or tie one leaf to end of stem. Hide tails of top leaves inside apple.
Stem (CC2)
Attach 3 strands of CC2 yarn of the desired length to the top of the apple. They should be long enough to hang out of both ends of a hardcover book. Braid them and attach a leaf at the bottom. Knot and trim ends evenly.
Please feel free to sell the bookmarks you’ve made, but please credit Crafty Reason and link back to the pattern here if you do so. Also, leave a comment if you notice anything wrong with the pattern–I usually just quickly jot down patterns I make up, in case I want to make something again, so I am not used to writing patterns that other people need to follow. 🙂
Last week when I was helping out Naomi’s teacher, she had me sharpen a whole box of pencils–I was glad she has the nice pencil sharpener now, but I wished I had gotten her a battery-operated sharpener! I also noticed her new apple bookmark is on her desk as yet another apple decoration–but I’m just glad she likes it!
~Crafty Reba
**New!! This pattern is now also available on Ravelry. You can purchase a PDF of the pattern there if you would like your own formatted copy.
Pattern © Crafty Reason. Please Contact Us for permission if you wish to reproduce any of our patterns.