My co-worker recently had a new baby. I wanted to make her a hat that would last through the winter, but my favorite baby hat pattern was for newborn-sized hats. I also wanted to do something a little more festive since she was born right around the holidays. So I made up this pattern to make a super cute hat in xmas colors.
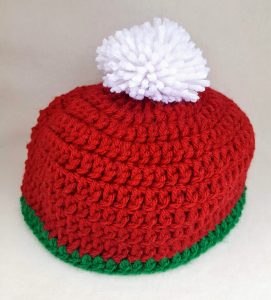
Holiday Hat with Pom-Pom, size 3-6 months
Terms/Abbreviations:
MC: Main Color yarn
CC: Contrasting Color yarn
Ch: Chain
Dc: Double Crochet
St: Stitch
Inc: Increase (2 sc in one stitch)
Sl st: Slip stitch
Rep: Repeat
FO: Fasten off
You will need:
Size H/4.5mm crochet hook
yarn in main and contrasting colors for the hat (I used red and green worsted weight yarn)
yarn for the pom-pom (I used white worsted weight)
yarn needle
scissors
2.5″ diameter circle of cardboard
Pattern Notes:
You can find tutorials on YouTube for how to make a magic ring/circle and how to make a pom-pom. I also include written instructions in the pattern below for how I make them.
You will be crocheting in rows and joining with a slip stitch at the end of each row.
Leave a few inches long tail at the start to use for sewing the pom-pom onto the top.
The slip stitch does not count as a stitch. The chain beginning each row does not count as a double crochet.
My finished hat’s diameter was about 5.5″.
Hat:
R1: In MC, make a magic circle, Ch 2, 12 dc in magic ring, sl st to join, Ch 2 (12)
R2: Inc in each st around, sl st to join, Ch 2 (24)
R3: *Inc in first st, dc in next st*, rep from * around, sl st to join, Ch 2 (36)
R4: *Inc in first st, dc in next 2 sts*, rep from * around, sl st to join, Ch 2 (48)
R5: *Inc in first st, dc in next 3 sts*, rep from * around, sl st to join, Ch 2 (60)
R6-10: Dc in each st around, sl st to join. Switch to CC, Ch 2 (60)
R11: Dc in each st around, sl st to join, FO, weave in ends (60)
Pom-Pom:
Here is how I made the pom-pom. There are many different ways!
Wrap pom-pom yarn about 100 times around a 2.5″ diameter circle of cardboard, leaving a long tail at the start.
Slide the yarn off the cardboard, keeping the loops together. Very tightly tie a knot around the middle of the loops, leaving another long tail.
Holding the loops together, cut the middle of the loops.
Shake out the pom-pom, holding onto the long tails. Trim the ends of the pom-pom to the desired length.
To attach the pom-pom, thread the pom-pom tails through the small opening at the top of the hat. Thread the long MC tail you started with at the top of the hat through the tied center of the pom-pom at the bottom and back down through the hole. Sew the pom-pom onto the hat from the inside using the MC tail. Thread the pom-pom tails through the stitches on the inside of the hat without going all the way through so you can’t see the stitches. I tied them all together since I know the hat will constantly be taken off by pulling on the pom-pom, so I wanted it to be attached extra well.
Please feel free to sell the hats you’ve made, but please credit Crafty Reason and link back to the pattern here if you do so. Also, leave a comment if you notice anything wrong with the pattern.
~Crafty Reba
**New!! This pattern is now also available on Ravelry. You can purchase a PDF of the pattern there if you would like your own formatted copy.
Pattern © Crafty Reason. Please Contact Us for permission if you wish to reproduce any of our patterns.