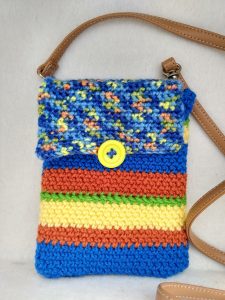
For her birthday, my sister asked for a cell phone cozy like the one I made for my parents, but she wanted hers to have a shoulder strap like a very small purse. So I modified my cell phone cozy pattern to have a more secure flap/button closure, with reinforced top sides and bottom to be able to support the weight of the phone from the shoulder strap, and adjusted the size to fit my sister’s iPhone 7 Plus.
Cell Phone Cozy “Purse-Style”
Terms/Abbreviations:
Ch: Chain
Sc: Single crochet
Hdc: Half double crochet
St: Stitch
Beg: Beginning (first stitch)
Sl st: Slip stitch
FLO: Front loops only
You will need:
Sizes H/8mm and F/3.75mm crochet hooks
Yarn A (bag)–worsted weight scrap yarn
Yarn B (flap closure)–Red Heart Gumdrop yarn (https://www.redheart.com/yarn/gumdrop)
Button (1 inch diameter)
yarn needle
scissors
strap
Pattern Notes:
You will be crocheting in a continuous spiral–do not join with a slip stitch at the end of each row.
Measure the device you’re making the cozy for when you make your starting chain, making sure you have an even number of stitches. You can decide whether to make it snug (sock-style) or looser (bag-style). For a purse-type cozy, I think bag style makes more sense because it will be easier to get the phone in and out of it.
The button closure is especially helpful for the looser bag-style, but I use it for my snug sock-style cozy too. You’ll want to measure your button and size the buttonhole in the flap accordingly. You may need to chain and skip more or fewer stitches if your button is larger or smaller than 1”.
My flap measured 3” long. You can do more or fewer rows depending on how long or short you want yours to be.
Use a stitch marker at the end of each round if you want your color changes to line up. This is a great project for scrap yarn–I found it worked best to make 2-3 rows in each color, with one “accent” color that I did one row at a time in (see additional notes below on the accent color treatment).
Crocheting in the Front Loops Only (FLO) refers to the loops closest to you. With hdc, I normally crochet in the two loops furthest away from me, creating a little rim on the inside of each row of my work. To create the slight definition in the accent row, I crochet in the two loops closest to me, leaving the loop furthest away from me empty to create the edging on the outside of my piece.

For the strap, I used a leather strap recycled from an old purse, but you could also make a strap from yarn (braiding or crocheting) or fabric and tie on or attach with keychain rings, carabiners, etc. See instructions below for reinforcing the top sides if you’re worried about the phone being too heavy and pulling at the top stitches. If you plan to reinforce the top, be sure to do at least 3 rows of one color at the top/end, so that the reinforcements are virtually invisible from the outside.
My pattern fits an iPhone 7 Plus. The finished cozy is 5.25 x 7”.
Cozy Pattern:
R1: With H hook using Yarn A, ch 44, sl st to beg. (44)
R2-24: Hdc around, changing colors as frequently as desired. (44)
If you’re making accent rows:
R12 and R22: Using a different color yarn from others used, hdc FLO around. (22)
Flap Pattern:
R25: When your cozy has almost reached the desired height (when it is just above the top of your phone), attach Yarn B. With F hook, sc 22 sts across. Ch1 and turn. (22)
R26-41: Sc 22 across, ch 1 and turn. (22)
If you’re using the button closure:
R42: To add your button hole, sc 9, ch4 and sk4, sc 9. FO and weave in end. (22)
If you’re not using the button closure:
R42: Sc 22 across, FO and weave in end. (22)
I sewed my button onto the bag around row 18.
Finishing:
Optional: Reinforcing for shoulder strap
After finishing flap, turn piece inside-out. Attach the top color yarn at each of the top side corners (one at a time) and do four single crochet stitches down the side, turn, skip a stitch, and do three slip stitches back up to top, crocheting over the attaching end.

Bottom
While piece is inside out, attach the bottom color yarn at one side of the bottom, and holding the bottom pieces together, single crochet them together. You may find it helpful to pin them together beforehand if you’re having trouble holding them straight and lined up. FO and weave in ends.
Alternatively, you may whip stitch the bottom together, but I feel that crocheting will make for a stronger bottom, since it has to hold a relatively heavy phone.
Please feel free to sell the cozies you’ve made, but please credit Crafty Reason and link back to the pattern here if you do so. Also, send us a message if you notice anything wrong with the pattern.
This pattern is also available on Ravelry. You can purchase a PDF of the pattern there if you would like your own formatted copy.
Happy crocheting!
~Crafty Reba
Pattern (c) Crafty Reason. Please Contact Us for permission if you wish to reproduce any of our patterns.