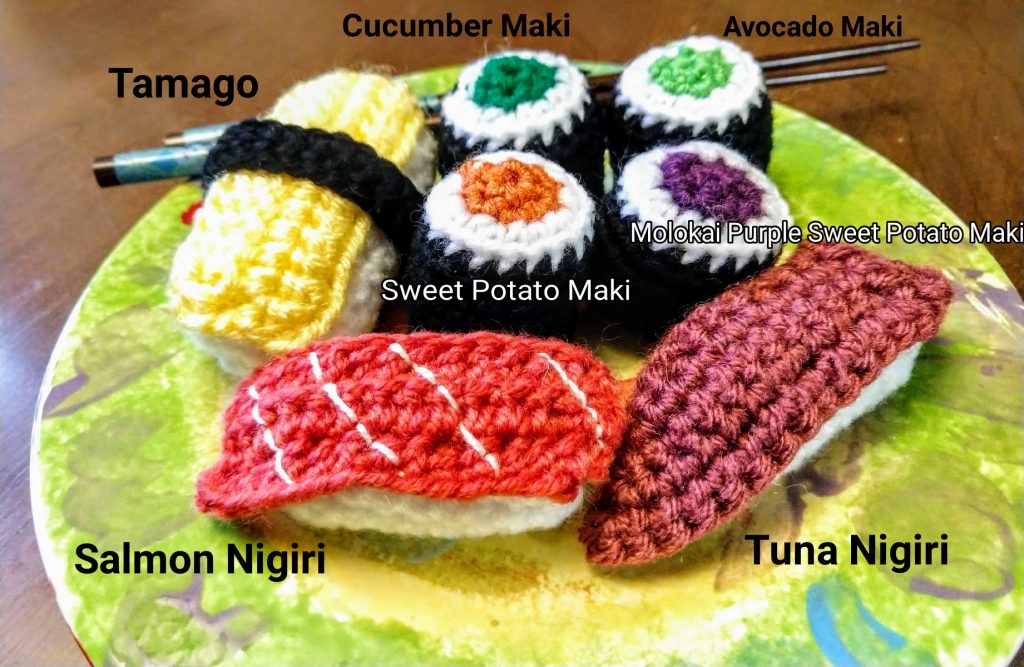
Recently we visited one of my college roommates and her toddler son. Having not been around little ones so much lately (at least, not that little), we were all pretty fascinated watching him play. He enjoyed stirring things (like my shoes!) in a pot with a big spoon. I remembered that Naomi loved play food when she was his age, and I remembered that she had (among the many usual plastic and wooden versions) a set of knit sushi that I loved. I believe they were made by one of our other very talented college roommates. When we returned home, I wanted to make a set of sushi for my friend’s son to play with. I found a great pattern here, but when I tried it out, I discovered that the sushis were way too small for a 15-month old–they were bite-sized and would be a choking hazard. So instead I made up my own sushi pattern for all my favorite kinds of sushi!
Sushi Pattern
Terms/Abbreviations:
Ch: Chain
MC: Magic circle
Sc: Single crochet
Dc: Double crochet
Inc: Increase (2 stitches in 1 stitch)
Dec: Decrease (1 stitch across 2 stitches)
BLO: Back loops only (crochet in the loops further away from you)
St: Stitch
Sk: Skip
Sl st: Slip stitch
Dec sl st: Decrease using slip stitches
FO: Finish off
BO: Bind off
You will need:
Size G/4mm crochet hook
White yarn (rice)
Black yarn (seaweed)
Yellow yarn (tamago–egg)
Pink/orange yarn (salmon)
Dark pink yarn (tuna)
Light green yarn (avocado)
Dark green yarn (cucumber)
Orange yarn (sweet potato)
Purple yarn (molokai purple sweet potato)
Stuffing
White embroidery thread
yarn needle
scissors
Pattern Notes:
I use the invisible decrease method. You can find tutorials on YouTube, or you can use whatever decrease method you typically use.
I used worsted weight scrap yarn. Using thicker or finer yarn will result in larger or smaller sushi.
For the maki rolls, when switching colors, sometimes I would switch a stitch early or do an extra stitch in the round just to line everything up better. Also, when decreasing an uneven number of stitches, I end with a slip stitch to the first stitch, so I round down for the stitch count for that round.
I didn’t switch back to the filling color at the end/bottom of the makis, just left it white, but if you wanted you could switch back to the filling color for R11 (shorter roll)/R12 (longer roll).
For salmon nigiri, I used small stitches to embroider the diagonal white lines so that children won’t get their fingers wrapped in the thread. If making for older children (10 and up) or adults, you could probably just sew the thread at either end of the diagonal, which I think would look better.
Rice Bases:
Larger Rice Ball (shown with tamago)
Using white yarn, MC 6 sts (6)
R2: inc around (12)
R3: (sc, inc) around (18)
R4-14: sc around (18)
Stuff lightly.
R15: (dec, sc) around (12)
R16: dec around (6)
FO, sl st to close. Weave end over hole to close and hide inside.
Small Rice Ball (shown with nigiris)
Using white yarn, MC 6 sts (6)
R2: inc around (12)
R3-10: sc around (12)
Stuff lightly.
R11: (dec, sc) around (9)
R12: dec around (4)
FO, sl st to close. Weave end over hole to close and hide inside.
Toppings:
Tamago (egg omelet)
Using yellow yarn, ch16 (16)
R2: sk2ch, dc across (14)
R3-4: Ch2, turn, dc across (14)
FO, leaving a long tail to sew to rice.
Seaweed wrap (shown with tamago)
Using black yarn, ch25 (25)
R2: sk1ch, sc across (24)
R3: Ch1, turn, sc across (24)
Do not BO. Leave long tail and sew ends together on underside of rice.
Salmon nigiri
Using pink/orange yarn, ch16 (16)
R2: sk2ch, dc across (14)
R3-4: Ch2, turn, dc across (14)
FO, leaving a long tail to sew to rice.
After sewing on, use embroidery thread and yarn needle to sew on diagonal white lines.
Tuna nigiri
Using dark pink yarn, ch10 (10)
R2: sk1ch, inc, sc 8 across, ch1, turn (10)
R3: sc 9 across, inc, ch1, turn (11)
R4: inc, sc 10 across, ch1, turn (12)
R5: sc 11 across, inc, ch1, turn (13)
R6: inc, sc 12 across, ch1, turn (14)
Turn work to crochet in shorter back side.
R7: dec, sc 4 across, ch1, turn (5)
R8: dec, sc 3 across, ch1, turn (4)
R9: sc 2 across, dec (3)
FO, leaving a long tail to sew to rice.
Maki Rolls:
Shorter roll
Using desired color of yarn, MC 6 sts (6)
R2: (inc, sc) around (9)
R3: Switch to white. Inc around (18)
R4: Switch to black. BLO sc around (18)
R5-8: sc around (18)
R9: BLO sc around (18)
Stuff lightly.
R10: Switch to white. Dec around (9)
R11: dec sl st around (4)
FO, sl st to close. Weave end over hole to close and flatten, and hide inside.
Longer roll
Using desired color of yarn, MC 6 sts (6)
R2: (inc, sc) around (9)
R3: Switch to white. Inc around (18)
R4: Switch to black. BLO sc around (18)
R5-9: sc around (18)
R10: BLO sc around (18)
Stuff lightly.
R11: Switch to white. Dec around (9)
R12: dec sl st around (4)
FO, sl st to close. Weave end over hole to close and flatten, and hide inside.
Please feel free to sell the sushi you’ve made, but please credit Crafty Reason and link back to the pattern (http://craftyreason.com/2019/08/22/pattern-sushi/) if you do so. Please contact us at craftyreason@gmail.com for permission if you wish to reproduce this pattern. Also, send us a message if you notice anything wrong with the pattern. Happy crocheting!
~Crafty Reba
Learn more about Crafty Reason at http://craftyreason.com/about-us/
This pattern is also available on Ravelry. You can purchase a PDF of the pattern there if you would like your own formatted copy.
Pattern © Crafty Reason. Please Contact Us for permission if you wish to reproduce any of our patterns.