Author: Reba

  • Pattern: Schwartz’s AKA “Flick’s” Hat from A Christmas Story

    Written by Reba at Crafty Reason
    http://craftyreason.com

    Credits:

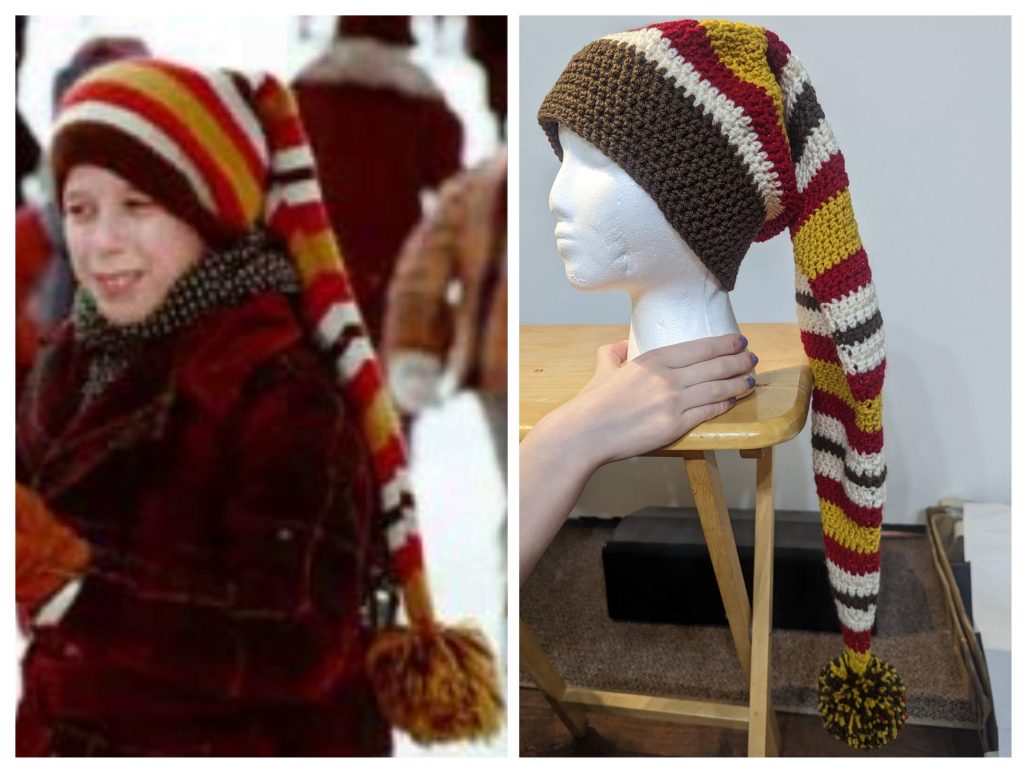
    Based on Schwartz’s Stocking Cap, original on display at A Christmas Story House & Museum: https://www.redriderleglamps.com/collections/replica-hats-beanie-caps/products/a-christmas-story-schwartz-stocking-cap-replica

    Movie screenshot appears courtesy of MGM/UA Entertainment Co.

    Pattern inspired by: “Santa’s Helper” Free Crochet Elf Hat Pattern With Ears
    https://makeanddocrew.com/free-crochet-elf-hat-pattern-with-ears/ 

    A Christmas Story Costume Designer: Mary E. McLeod

    Wardrobe Department: Lynda Kemp

    Terms/Abbreviations:

    MC: Magic circle

    CH: Chain

    DC: Double crochet

    SL ST: Slip stitch

    HDC: Half-double crochet 

    BO: Bind off

    You Will Need:

    5mm crochet hook

    Yarn:

    Color A: Gold

    Color B: Red

    Color C: Cream

    Color D: Brown

    Pom-Pom Maker (biggest size)

    Pattern Notes:

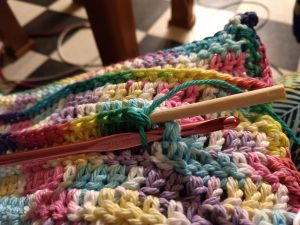
    You will be crocheting a long stocking cap starting at the tip and ending at the head. The hat is crochet in rows, not a spiral, due to the striped color pattern. I found it easiest to carry the colors throughout rather than binding off and reattaching at every color change. You will have a long row of attached yarn along the inside of your finished hat (see picture below). Always change colors when slip stitching to the top of the beginning chain for an even, clean color change. Beginning chain 3 counts as a stitch.

    Instructions:

    [[Begin stocking]]

    Foundation (Color A): MC

    Round 1 (Color A): Ch 3, 5 dc in ring, sl st to 3rd ch at beginning of round to join. (6 dc)

    Round 2 (Color A): Ch 3, dc in each dc, sl st to 3rd ch at beginning of round to join. (6 dc)

    Round 3 (Color A): Ch 3, 2 dc in next dc, (dc in next dc, 2 dc in next dc) twice, sl st to 3rd ch at beginning of round to join. (9 dc)

    Round 4 (Color B): Ch 3, dc in each dc, sl st to 3rd ch at beginning of round to join. (9 dc)

    Round 5 (Color B): Ch 3, dc in each dc, sl st to 3rd ch at beginning of round to join. (9 dc)

    Round 6 (Color C): Ch 3, dc in next dc, 2 dc in next dc, (dc in next 2 dc, 2 dc in next dc) twice, sl st to 3rd ch at beginning of round to join. (12 dc)

    Round 7 (Color C): Ch 3, dc in each dc, sl st to 3rd ch at beginning of round to join. (12 dc)

    Round 8 (Color D): Ch 3, dc in next 2 dc, 2 dc in next dc, (dc in next 3 dc, 2 dc in next dc) twice, sl st to 3rd ch at beginning of round to join. (15 dc)

    Round 9 (Color C): Ch 3, dc in each dc, sl st to 3rd ch at beginning of round to join. (15 dc)

    Round 10 (Color C): Ch 3, dc in next 3 dc, 2 dc in next dc, (dc in next 4 dc, 2 dc in next dc) twice, sl st to 3rd ch at beginning of round to join. (18 dc)

    Round 11 (Color B): Ch 3,dc in each dc, sl st to 3rd ch at beginning of round to join. (18 dc)

    Round 12 (Color B): Ch 3, dc in next 4 dc, 2 dc in next dc, (dc in next 5 dc, 2 dc in next dc) twice, sl st to 3rd ch at beginning of round to join. (21 dc)

    Round 13 (Color A): Ch 3,dc in each dc, sl st to 3rd ch at beginning of round to join. (21 dc)

    Round 14 (Color A): Ch 3, dc in next 5 dc, 2 dc in next dc, (dc in next 6 dc, 2 dc in next dc) twice, sl st to 3rd ch at beginning of round to join. (24 dc)

    Round 15 (Color A): Ch 3,dc in each dc, sl st to 3rd ch at beginning of round to join. (24 dc)

    Round 16 (Color B): Ch 3, dc in next 6 dc, 2 dc in next dc, (dc in next 7 dc, 2 dc in next dc) twice, sl st to 3rd ch at beginning of round to join. (27 dc)

    Round 17 (Color B): Ch 3, dc in each dc, sl st to 3rd ch at beginning of round to join. (27 dc)

    Round 18 (Color C): Ch 3, dc in next 7 dc, 2 dc in next dc, (dc in next 8 dc, 2 dc in next dc) twice, sl st to 3rd ch at beginning of round to join. (30 dc)

    Round 19 (Color C): Ch 3,dc in each dc, sl st to 3rd ch at beginning of round to join. (30 dc)

    Round 20 (Color D): Ch 3, dc in next 8 dc, 2 dc in next dc, (dc in next 9 dc, 2 dc in next dc) twice, sl st to 3rd ch at beginning of round to join. (33 dc)

    Round 21 (Color C): Ch 3, dc in each dc, sl st to 3rd ch at beginning of round to join. (33 dc)

    Round 22 (Color C): Ch 3, dc in next 9 dc, 2 dc in next dc, (dc in next 10 dc, 2 dc in next dc) twice, sl st to 3rd ch at beginning of round to join. (36 dc)

    Round 23 (Color B): Ch 3,dc in each dc, sl st to 3rd ch at beginning of round to join. (36 dc)

    Round 24 (Color B): Ch 3, dc in next 10 dc, 2 dc in next dc, (dc in next 11 dc, 2 dc in next dc) twice, sl st to 3rd ch at beginning of round to join. (39 dc)

    Round 25 (Color A): Ch 3,dc in each dc, sl st to 3rd ch at beginning of round to join. (39 dc)

    Round 26 (Color A): Ch 3, dc in next 11 dc, 2 dc in next dc, (dc in next 12 dc, 2 dc in next dc) twice, sl st to 3rd ch at beginning of round to join. (42 dc)

    Round 27 (Color A): Ch 3,dc in each dc, sl st to 3rd ch at beginning of round to join. (42 dc)

    Round 28 (Color B): Ch 3, dc in next 12 dc, 2 dc in next dc, (dc in next 13 dc, 2 dc in next dc) twice, sl st to 3rd ch at beginning of round to join. (45 dc)

    Round 29 (Color B): Ch 3,dc in each dc, sl st to 3rd ch at beginning of round to join. (45 dc)

    Round 30 (Color C): Ch 3,dc in each dc, sl st to 3rd ch at beginning of round to join. (45 dc)

    Round 31 (Color C): Ch 3,dc in each dc, sl st to 3rd ch at beginning of round to join. (45 dc)

    Round 32 (Color D): Ch 3,dc in each dc, sl st to 3rd ch at beginning of round to join. (45 dc)

    Round 33 (Color C): Ch 3,dc in each dc, sl st to 3rd ch at beginning of round to join. (45 dc)

    Round 34 (Color C): Ch 3,dc in each dc, sl st to 3rd ch at beginning of round to join. (45 dc)

    Round 35 (Color B): Ch 3,dc in each dc, sl st to 3rd ch at beginning of round to join. (45 dc)

    Round 36 (Color B): Ch 3,dc in each dc, sl st to 3rd ch at beginning of round to join. (45 dc)

    Round 37 (Color A): Ch 3,dc in each dc, sl st to 3rd ch at beginning of round to join. (45 dc)

    Round 38 (Color A): Ch 3,dc in each dc, sl st to 3rd ch at beginning of round to join. (45 dc)

    Round 39 (Color A): Ch 3,dc in each dc, sl st to 3rd ch at beginning of round to join. (45 dc)

    Round 40 (Color A): Ch 3,dc in each dc, sl st to 3rd ch at beginning of round to join. (45 dc)

    Round 41 (Color B): Ch 3,dc in each dc, sl st to 3rd ch at beginning of round to join. (45 dc)

    Round 42 (Color B): Ch 3,dc in each dc, sl st to 3rd ch at beginning of round to join. (45 dc)

    Round 43 (Color C): Ch 3,dc in each dc, sl st to 3rd ch at beginning of round to join. (45 dc)

    Round 44 (Color C): Ch 3,dc in each dc, sl st to 3rd ch at beginning of round to join. (45 dc)

    Round 45 (Color D): Ch 3,dc in each dc, sl st to 3rd ch at beginning of round to join. (45 dc)

    Round 46 (Color D): Ch 3, dc in next 13 dc, 2 dc in next dc, (dc in next 14 dc, 2 dc in next dc) twice, sl st to 3rd ch at beginning of round to join. (48 dc)

    Round 47 (Color C): Ch 3,dc in each dc, sl st to 3rd ch at beginning of round to join. (48 dc)

    [[Begin cap]]

    Round 48 (Color C): Ch 3, dc in next 6 dc, 2 dc in next dc, (dc in next 7 dc, 2 dc in next dc) 5 times, sl st to 3rd ch at beginning of round to join. (54 dc)

    Round 49 (Color B): Ch 3, dc in next 7 dc, 2 dc in next dc, (dc in next 8 dc, 2 dc in next dc) 5 times, sl st to 3rd ch at beginning of round to join. (60 dc)

    Round 50 (Color B): Ch 3, dc in next 8 dc, 2 dc in next dc, (dc in next 9 dc, 2 dc in next dc) 5 times, sl st to 3rd ch at beginning of round to join. (66 dc)

    Round 51 (Color A): Ch 3, dc in next 9 dc, 2 dc in next dc, (dc in next 10 dc, 2 dc in next dc) 5 times, sl st to 3rd ch at beginning of round to join. (72 dc)

    Round 52 (Color A): Ch 3, dc in next 10 dc, 2 dc in next dc, (dc in next 11 dc, 2 dc in next dc) 5 times, sl st to 3rd ch at beginning of round to join. (78 dc)

    Round 53 (Color A): Ch 3, dc in next 11 dc, 2 dc in next dc, (dc in next 12 dc, 2 dc in next dc) 5 times, sl st to 3rd ch at beginning of round to join. (84 dc)

    Round 54 (Color A): Ch 3,dc in each dc, sl st to 3rd ch at beginning of round to join. (84 dc)

    Rounds 55-56 (Color B): Ch 3, dc in each dc, sl st to 3rd ch at beginning of round to join. (84 dc)

    Round 57 (Color C): Ch 2, hdc in next 9 dc, dec in next hdc, (hdc in next 10 hdc, dec in next hdc) 5 times, sl st to 2nd ch at beginning of round to join. (78 hdc)

    Round 58 (Color C): Ch 2, hdc in next 8 dc, dec in next hdc, (hdc in next 9 hdc, dec in next hdc) 5 times, sl st to 2nd ch at beginning of round to join. (72 hdc)

    Round 59 (Color D): Ch 2, hdc in next 7 dc, dec in next hdc, (hdc in next 8 hdc, dec in next hdc) 5 times, sl st to 2nd ch at beginning of round to join. (66 hdc)

    Rounds 60-65 (Color D): Ch 2, hdc in each hdc, sl st to 2nd ch at beginning of round to join. (66 hdc)

    Round 66 (Color D): Ch 2, hdc in each hdc, sl st to 2nd ch at beginning of round to join, BO, weave in ends. (66 hdc)

    Finishing / Final Assembly

    Make a large pom-pom and sew securely to the hat’s stocking tip. I used gold, red, and brown (very little red since I ran out of the yarn).

    Please feel free to sell the hats you’ve made, but please credit Crafty Reason and link back to the pattern here if you do so. Please contact us at craftyreason@gmail.com for permission if you wish to reproduce this pattern. Also, send us a message if you notice anything wrong with the pattern. Happy crocheting!

    ~Crafty Reba
    Learn more about Crafty Reason at http://craftyreason.com/about-us/

    This pattern is also available on Ravelry. You may purchase a PDF of the pattern there if you would like your own formatted copy.


  • Pattern: Spiral Purse

    My daughter has just reached the age where she wants to carry her own purse. Over the past couple of months, she has used her allowance money to buy two different purses. One she liked but it was too small to hold everything–she learned the lesson of practicality and function over fashion early! The other one fit everything all right, but she declared it “just wasn’t her.” So I thought (as she put it) “Hold my hook!” (my crochet hook, that is) and I came up with a purse that is 100% her! It’s funky and fun and colorful and unique. And it fits everything, too.

    Pattern: Spiral Purse

    Written by Reba at Crafty Reason
    http://craftyreason.com

    Terms/Abbreviations:

    MC: Magic circle
    DC: Double crochet
    BLO: Back loop only
    STS: Stitches
    HDC: Half-double crochet
    SC: Single crochet
    CH: Chain
    WC: Waistcoat stitch, aka knit stitch
    WS: Wrong side
    RS: Right side
    BO: Bind off

    You will need:

    Red Heart Super Saver Neon Stripes (less than 1 skein)
    Sizes 4 and 5 crochet hooks
    Zipper (I used a rainbow zipper to match the bright colors in my yarn)
    Embroidery needle
    Sewing machine or needle and thread

    Pattern Notes:

    You will be crocheting a round purse with a spiral pattern in a continuous spiral. It is simply constructed, with two round sides, one long loop that comprises both the base and the strap, and a zipper closure with two small flat pieces to attach the zipper to the purse. The zipper closure is optional and may be modified to meet the preference of the user. You may add a flap closure, or a chain loop around a button, or you may even leave the top completely open, although if you do this, I suggest crocheting the strap a little more closely “in” over the top of the circles, so that the purse will hold its shape better. With the zipper closure, the tops could be as wide as the strap allows for the easiest access.

    The Waistcoat Stitch (WC) aka Knit Stitch will create a sturdy base and strong strap for your purse. Heart Hook Home has a great step-by-step guide including a video tutorial (https://hearthookhome.com/waistcoat-crochet-stitch/). If you don’t feel confident crocheting in the waistcoat stitch, you can do single crochets instead.


    Crochet Instructions:

    Purse sides–Make 2.

    With size H (5mm) crochet hook, in a variegated color worsted weight yarn:

    1. 12 dc in mc (12)
    2. (Inc dc) around (24)
    3. In BLO until otherwise stated, (Inc, dc) around (36)
    4. (Inc, dc x 2) around (48)
    5. (Inc, dc x 3) around (60)
    6. (Inc, dc x 4) around (72)
    7. (Inc, dc x 5) around (84)
    8. (Inc, dc x 6) around (96)
    9. (Inc, dc x 7) around (108)
    10. Continue in this pattern, increasing stitch count by 12 (increasing the single DC count by one) each round until the diameter measures 10”. 
    11. For final round, final three sts: hdc x 2, sc, sl st to first st in previous row. BO and weave in end. Note: after cutting yarn, you can pull it all the way up through the stitch, then weave it around the next stitch and back through the original stitch, making the end a little less noticeable. Then weave in end as desired.


    Purse bottom and strap loop–Make 1.

    Use same hook and yarn:

    1. Ch11. (11)
    2. Starting in 2nd ch from hook, sc across. (10)
    3. Ch1, turn. Sc in same st, wc x 8, sc in last st, ch1, turn. (10)
    4. Rep row 3 until purse bottom and strap measures your desired length. (Mine was 47 inches.)
    5. Fold strap in half with WS facing out. SC across, attaching two sides together. (10)
    6. Turn project RS facing out, sideways, and place one purse side against the strap, lined up along the edge. Work SC into the strap lined up with the sc sts along the purse side. BO and weave in ends. Repeat with other purse side.


    Purse zipper closure attachments–Make 2.

    With size 7 (4.5mm) hook:

    1. Ch6. (6)
    2. Starting in 2nd ch from hook, sc across. (5)
    3. Ch1, turn. Sc in same st, wc x 3, sc in last st, ch1, turn. (5)
    4. Rep row 3 for 51 rows, until strap is 52 rows long. BO and weave in ends.


    Finishing / Final Assembly

    Depending on the type of zipper you get, you may have to trim the zipper to the length you want and attach the pull. Cut it a little longer than you expect to use. Using a sewing machine or by hand, attach the zipper to the closure attachment strips with the zipper in the center. Then using embroidery needle and project yarn, sew the zipper to the top/opening of the purse, starting at the front strap end, moving across the strap, across one circular top side of the purse, across the other strap end over the zipper, and across the other circular top side of the purse. Tuck the extra flaps of closed zipper inside the purse just underneath the strap on either side.

    Please feel free to sell the purses you’ve made, but please credit Crafty Reason and link back to the pattern here if you do so. Please contact us at craftyreason@gmail.com for permission if you wish to reproduce this pattern. Also, send us a message if you notice anything wrong with the pattern. Happy crocheting!

    ~Crafty Reba
    Learn more about Crafty Reason at http://craftyreason.com/about-us/

    This pattern is also available on Ravelry. You can purchase a PDF of the pattern there if you would like your own formatted copy.

  • Pattern: Pocket Pony (Crochet or Knit)

    I work part-time at the ranch where my daughter and I ride horses, and I wanted to make a fellow ranch worker’s daughter a ragdoll horse for her third birthday. The original horse was a little bigger and not as floppy as I had hoped. I thought it would be cute if the horse were smaller, and the Pocket Pony was born!

    Pattern: Pocket Pony (Crochet or Knit)

    Written by Reba at Crafty Reason
    http://craftyreason.com

    Crochet Terms/Abbreviations:

    Ch: Chain
    Sc: Single crochet
    Sl st: Slip stitch
    FO: Finish off

    You will need:

    size G/4mm hook
    I Love This Yarn! Toasted Almond
    I Love This Yarn! Brown
    Small amount of Fiberfill stuffing (or can use scrap yarn to stuff)
    Black 10mm buttons or embroidery thread for eyes
    yarn needle

    Crochet Pattern Notes:

    Watch my three-part video tutorial to follow along and crochet your Pocket Pony with me!

    When sl st and turning without ch 1 (row 12), I lay the working yarn across the sl st before I do the first sc to hide the sl st.
    In my video tutorial (video 1, 19:50), I made the sl st in the same st as the last st of the row, but I later changed the pattern slightly so the sl st is in its own st, so that count is a little different (12 sts in row 12, instead of 11). I hadn’t been counting the sts correctly in the video!

    Finished pony is about 4” tall x 5” long (from nose to tail).

    I’ve made several variations using different colors of yarn, different colored buttons for eyes, making the tails different thickness and lengths, and lengthening the ears.

    Crochet Instructions:

    Make 2. Leave a long tail for sewing on one.

    Ch 11
    R1-3: sc 10, ch1, turn (back leg) (10)
    R4-7: sc 6, ch 1, turn (leave 4) (6)
    R8: sc 6, ch 5, turn (front leg) (10)
    R9-10: sc 10, ch 1, turn (10)
    R11: sc 10, ch 9, turn (18)
    R12: sc in 3rd ch from hook, sc 12, sl st, turn (leave 4) (do not ch 1) (12)
    R13: sc 11, ch1, turn (leave 1/ear) (11)
    R14-17: sc 4, ch1, turn (4)
    R18: sc 4, FO (4)

    Sew together along edge in running stitch, stuffing very lightly as you go. Do not sew ears, sew below them across its bottom (so there will be 2 ears). Sew on buttons or embroider eyes. Hide tails in body.

    Loop technique for mane/tail

    Watch my video tutorial for making the “loose loops” for the mane and tail.

    I made 3 loops in one hole for the forelock.

    I made 2-3 loops in each of the 6 holes down the back of the neck for the mane (make loops one in each hole going down neck, then one in each hole going back up neck). My mane loops are about ¼ – ½ inch long.

    For the tail, I made 4 long loops in the same hole, about 2.5-3” long.

    black dots = single crochet
    black square = slip stitch
    red squares = start row


    Knit Pattern Notes

    I made this knitting option for a knitter friend. Although I learned to knit long before I learned to crochet, I was never very good at knitting, and never learned how to read a pattern. So this pattern may be extremely clumsily written! A more experienced knitter may find better ways to both knit the pony and write the pattern.

    The sewing, eyes, mane, and tail techniques are all the same for knit and crochet versions.

    You Will Need

    The same materials listed above, except I used size 10 bamboo knitting needles instead of the crochet hook. I’ve no idea if this is the right size for worsted weight yarn, but those are the only needles I have.

    Knitting Instructions

    Pony Side A:

    CO 10
    R1 (RS): Knit
    R2 (WS): Purl
    Rep Rows 1-2 for Rows 3-4.
    R5: BO4, K5
    R6: Purl
    R7: Knit
    R8: Purl
    R9: CO 4, K10
    R10: Purl
    R11: Knit
    R12: Purl
    R13: BO4, K5
    R14: CO8, BO1 (ear), P12
    R15: B01 (chest), K11
    R16: Purl
    R17: BO7, K4
    R18: Purl
    R19: Knit
    R20: Purl
    R21: BO.

    Pony Side B:

    CO 10
    R1: Purl
    R2: Knot
    Rows 3 and 4: Rep Rows 1 and 2.
    R5: BO4, P5
    R6: Knit
    R7: Purl
    R8: Knit
    R9: CO4, P10
    R10: Knit
    R11: Purl
    R12: Knit
    R13: BO4, P5
    R14: CO8, BO1 (ear), K12
    R15: BO1 (chest), P11
    R16: Knit
    R17: BO6, P4
    R18: Knit
    R19: Purl
    R20: Knit
    R21: BO, leaving a long tail for sewing

    Please feel free to sell the Pocket Pony you’ve made, but please credit Crafty Reason and link back to the pattern here if you do so. Please contact us at craftyreason@gmail.com for permission if you wish to reproduce this pattern. Also, send us a message if you notice anything wrong with the pattern. Happy crocheting and knitting!

    ~Crafty Reba
    Learn more about Crafty Reason at http://craftyreason.com/about-us/

    This pattern is also available on Ravelry. You can purchase a PDF of the pattern there if you would like your own formatted copy.

  • Pattern: Leaf Sheep Sea Slug

    For Jason’s birthday I crochet him a leaf sheep! I couldn’t find a pattern anywhere, so I made up my own.

    What is a leaf sheep?

    The leaf sheep, also known as the leaf slug, is a tiny species of sea slug found in the oceans near Japan, the Philippines, and Indonesia. They are called “leaf sheep” because the shape of their faces and the protrusions on either side of their heads are reminiscent of sheep’s faces and horns. Leaf sheep are tiny, between 5mm and 1cm long, and they are bioluminescent because of the green algae that they eat and are able to photosynthesize.

    Photo by alif_abdulrahman – Costasiella Kuroshimae, CC BY-SA 2.0, https://commons.wikimedia.org/w/index.php?curid=41894580 

    Terms/Abbreviations:

    Ch: Chain
    Dc: Double crochet
    FO: Finish off
    Hdc: Half double crochet
    MC: Magic circle
    Rep: Repeat
    Sc: Single crochet
    Sl st: Slip stitch
    St sp: Stitch space

    You will need:

    Size 10 white cotton crochet thread
    Size 5 craft thread: light green, purple, bright pink, small amount black
    24 gauge steel galvanized wire
    Sizes 4 and 6 steel crochet hooks
    Fiberfill stuffing (or can use scrap yarn to stuff)
    Embroidery needle

    Pattern Notes:

    You will be crocheting a leaf sheep sea slug out of crochet thread and craft thread.

    To make the leaves stand up, you will crochet a small length of wire to one side of each leaf. You can search YouTube for tutorials showing how to do this, or please message me and I will be happy to make a video tutorial. Trim wire to be slightly shorter than desired, then pull down after attaching so top is not pointy. Leave ~.5-1cm of wire at the bottom to stick into body. IMPORTANT SAFETY NOTE: Please omit wire if making a toy for a child. Leaves may not stand up without wire, but wire would not be safe for children.

    I have included links to the items you will need. Please note these are not the exact items I used to make my leaf sheep, since I have older hand-me-downs of most items. Other types and sizes of crochet thread and craft thread would work fine, but you may need to adjust your hook size to fit your materials. You want your work to be tight enough so that the stuffing doesn’t show through.

    I use “rep from * Xx” to indicate the total number of times you will be repeating a sequence. For example, “*sc, inc rep from * 3x” means to single crochet then increase in the next stitch three times, covering six total stitches.

    I made 8 long leaves and 4 short leaves. They get increasingly difficult to sew on the more you attach. Feel free to add as many as desired!

    The finished leaf sheep is approximately 1.33” long x 2.5” tall. 

    Body/Head:

    Crochet in a continuous spiral. Using size 6 steel hook and white crochet thread:
    R1: MC 6 sts (6)
    R2: inc x 6 (12)
    R3: *sc, inc rep from * 3x; inc x 6 (21)
    R4: *inc, 2sc rep from * 3x; inc x 3; *2sc, inc rep from * 2x; inc x 3 (32)
    Rs 5-8: sc x 12; *hdc x 3, dc x 3, hdc x 3 rep 2x with 2sc in-between (32)
    R9: *dec, 2sc rep from * 3x; dec x 3; *2sc, dec rep from * 2x; dec x 3 (21)
    R10: *sc, dec rep from * 6x (15)
    Stuff head lightly. Continue to add stuffing as you go. Do not overstuff.
    Rs 11-18: sc around (15)
    R19: dec x 6; sc (7)
    FO, leaving a tail to tightly close up the small remaining hole by weaving the ends through each stitch and then pulling to cinch closed.

    Horns/Ears:

    Make 2. Using size 4 steel hook and purple craft thread:
    Ch2.
    R1: In 2nd ch from hook, sc 2. (2) Ch1, turn.
    R2: sc; inc. (3) Ch1, turn.
    Rs 3-10: sc x 3. (3) Ch1, turn.
    FO, leaving long tail for sewing. Sew on slightly curved on either side of head. Weave in ends.

    Long leaves:

    Make 8. Using size 4 steel hook and light green craft thread, leaving a long tail for sewing:
    Ch17.
    R1: Starting in 2nd ch from hook, 2sc; 3hdc; 6dc; 3hdc; 2sc. (16) Ch1, turn.
    R2: Sc across over wire. On last st, attach pink thread with sl st. (16)
    You will now be crocheting at the top of the leaf.
    R3: (Sc, dc) in 1st st sp. Dc in 2nd st sp. (3)
    FO, weave in ends.

    Short leaves:

    Make 4. Using size 4 steel hook and light green craft thread, leaving a long tail for sewing:
    Ch7.
    R1: Starting in 2nd ch from hook, 1sc; 1hdc; 2dc; 1hdc; 1sc. (6) Ch1, turn.
    R2: Sc across over wire. On last st, attach pink thread with sl st. (6)
    You will now be crocheting at the top of the leaf.
    R3: (Sc, hdc) in 1st st sp. Hdc in 2nd st sp. (3)
    FO, weave in ends.

    Assembly:

    Using black craft thread, make knots for eyes and attach close together near top of face, around row 4. You can search YouTube for how to make simple knots for stuffed animals’ eyes, or you can use French knots if you are able (I am “knot.”) 😉
    I wrapped thread twice for eye knots.

    Using pink craft thread, make knots for “cheeks” and attach one on each side of the face, towards the bottom on each “cheek,” around row 6. I wrapped thread three times for cheek knots.

    Attach horns/ears around row 6–lined up at the top near the eyes.

    Attach leaves staggered over top of body so they stick out all around.


    Please feel free to sell the leaf sheep you’ve made, but please credit Crafty Reason and link back to the pattern here if you do so. Please contact us at craftyreason@gmail.com for permission if you wish to reproduce this pattern. Also, send us a message if you notice anything wrong with the pattern. Happy crocheting!

    ~Crafty Reba

    Learn more about Crafty Reason at http://craftyreason.com/about-us/.

    This pattern is also available on Ravelry. You can purchase a PDF of the pattern there if you would like your own formatted copy.

    Pattern © Crafty Reason. Please Contact Us for permission if you wish to reproduce any of our patterns.


  • Pattern: Holey Baby Blanket

    One of my friends and most loyal customers requested a baby blanket with big holes for her baby daughter, who enjoyed twining her fingers through the blanket I made last year for her big brother. I made up my own pattern, and while I was crocheting the blanket, my daughter Naomi begged for one of her own, which my mom then saw and requested one for herself as well.

    Holey Blanket Pattern

    Terms/Abbreviations:

    Ch: Chain
    Dc: Double crochet
    St: Stitch
    Sk: Skip
    Rep: Repeat
    FO: Finish off

    This pattern is written in three sizes:
    Baby: Finished blanket is 32″ x 32″.
    34 “spaces” across
    Child size: Finished blanket is 36” x 68″.
    36 “spaces” across (short side)
    Throw/adult size: Finished blanket is 40” x 50”.
    Approx. 40 “spaces” across (short side)

    You will need:

    Baby: 5.33 100g balls of Bernat Baby Blanket Peachy (yarn A)
    Size N / 10mm hook
    Small amount of Bernat Softee Baby Cotton Petal (yarn B)
    Size G / 4mm hook
    Yarn needle

    Child: 10.33 100g balls of Bernat Baby Blanket Pitter Patter
    Size P / 11.5mm hook
    Yarn needle

    Throw/adult: 2.5 300g balls of Bernat Blanket Teal Dreams
    Size P / 11.5mm hook
    Yarn needle

    Pattern Notes:

    Work loosely. The baby blanket has a cotton border added for extra sturdiness.
    I did not keep track of how many sts or chs I used for the adult/throw blanket, but I’m including the measurements because you can recreate it just using these and the st pattern.


    Baby Blanket:

    Using Yarn A, ch 67.
    R1: In third ch from hook, *dc, ch1, sk. Rep from * to end of row. Ch2, turn.
    R2-41: Dc in first space between two dcs and ch in r1, ch1, sk, dc. Rep *dc, ch1, sk to end of row. Do last dc in row in edge st instead of space. Ch2, turn.
    Rep R2 until blanket is about 32″ square. (41 rows, R2-41)

    Border
    Using Yarn B, hdc 1 row around edge, about 1 st per row/hole (41 per side). Make 3 hdcs in each corner to turn. Add cotton border using yarn B for sturdiness (hdc 1 row around edge, 3 hdcs in each corner to turn). Join to first st in border, FO, weave in ends.

    Child Blanket:

    Ch 75.
    R1: In third ch from hook, *dc, ch1, sk. Rep from * to end of row. Ch3, turn.
    R2: Dc in first space between two dcs and ch in r1, ch1, sk, dc. Rep *dc, ch1, sk to end of row. Do last dc in row in edge st instead of space. Ch3, turn.
    Rep R2 until blanket is desired length (I made mine about 5’8”). FO, weave in ends.


    Throw/adult Blanket:

    Ch to slightly more than your desired length, ending on an odd number of sts in your ch.
    R1: In third ch from hook, *dc, ch1, sk. Rep from * to end of row. Ch3, turn.
    R2: Dc in first space between two dcs and ch in r1, ch1, sk, dc. Rep *dc, ch1, sk to end of row. Do last dc in row in edge st instead of space. Ch3, turn.
    Rep R2 until blanket is desired length (I made mine 40” x 50”). FO, weave in ends.


    Please feel free to sell the blankets you’ve made, but please credit Crafty Reason and link back to the pattern here if you do so. Please Contact Us for permission if you wish to reproduce this pattern. Also, send us a message if you notice anything wrong with the pattern. Happy crocheting!

    ~Crafty Reba
    Learn more about Crafty Reason at http://craftyreason.com/about-us/

    This pattern is also available on Ravelry. You can purchase a PDF of the pattern there if you would like your own formatted copy.

    Pattern © Crafty Reason. Please Contact Us for permission if you wish to reproduce any of our patterns.

  • Pattern: Keychain Display Holder

    My daughter Naomi collects keychains. She likes to clip them to the zippers on her backpack, but lately she has so many that they weigh the front of her backpack down. I wanted to make her something to hold and display her collection (the ones that aren’t currently on her backpack). I also wanted it to be easy enough for her to add and remove keychains that she will be able to readily cycle through her collection as frequently as she wants to.

    Keychain Display Holder Pattern

    Terms/Abbreviations:
    Ch: Chain
    Sc: Single crochet
    Dc: Double crochet
    St: Stitch
    Sl st: Slip stitch
    FO: Finish off

    You will need:
    I-9 5.5mm hook
    5 disposable chopsticks or similar-size and shape dowels (approx. 9″ long)
    1 ball Lily Sugar n Cream Fleur de Lavender yarn (yarn A)
    1 ball Lily Sugar n Cream Psychedelic yarn (yarn B)
    20 key chain holders (I used these heart-shaped paper clips, which securely attached to the chains, and the U-shaped center could be bent out for the keychains to easily be hung on or removed from)

    Pattern Notes:
    This pattern describes how to make a display holder for keychains or any other small objects that could be hung up.

    Back Piece Pattern–yarn A
    R1: ch 50. Place marker. Ch 30. Sl st to beg (1st ch). Ch 2 and turn. Work in the row of 30 sts. The ch 50 will become the hanger.
    R2-24: dc across. Ch2, turn. (30)
    R25: dc across. Ch1, turn. (30)
    R26: sc across. FO and weave in end. (30)

    Measure and place markers at 3″ vertical intervals for dowel placement; different markers at 1.5″ vertical intervals between and above and below those for chain row placement; and markers at 1.5″ horizontal intervals for chain row placement. Dowels will also be crocheted on at the top and bottom with yarn B.

    Dowels and Chains Pattern–yarn B

    Border Edge
    Attach yarn at the top corner opposite from project start. Note: this will yield the “back” sides of the sc sts on the front side of the piece, but I prefer to have the woven-in ends on opposite sides. If having the front of the sc sts showing is important, attach yarn B on the same side at project start. Sc along chain (50 sts), then across top back to starting st (30 sts), then down side (42-46 sts), across bottom (30 sts), and up the other side (42-46 sts). Make 2 sc in each corner to turn. Work around hanging chain and sl st to beginning of color B to end border. Do not cut yarn. Ch1 and turn to start working back across the top to attach the first dowel.

    Dowels
    Holding the dowel in place, sc over it across the top (30 sts). Sc along corner and down the side to the first marker (5 sts). Turn at st marker and sc horizontally across front of work in the raised ridge of sts. Pick up as much of each st as possible (the keychains will be hanging from chains attached to these sts).

    At the other side, turn and sc down the side to the second marker (5 sts). Attach second dowel by scing across and over it as with first dowel. Repeat pattern of alternating dowel and row of sc at markers to end of back piece.

    Notes:
    If the dowel attachment lines up with the posts of dcs, it’s an extra strength bonus. (See picture).

    Depending on how the sts line up, an extra st and ch1 may be needed when turning from side to crochet across row to make the transition look like a right angle.

    Move down the work in a large “S” pattern. Only one side of each little section will have a second row of sc on the edge. (See picture.)

    Chains
    Attach yarn B to top on the backside, 5 sts from left. Sc into top row with dowel, then ch4-7 and attach with sl st to ridge row 5 sts away from edge (or previous chain in later rows). Continue chaining and slip stitching until reaching the bottom. Number of chs needed will vary with distance between dowels and ridge rows.

    At bottom, sl st 5 along dowel, then ch4-7 and attach with sl st to ridge row. Continue chaining and slip stitching until reaching the top. Try to use the same number of chs between each ridge row/dowel. Repeat until there are 5 vertical chain rows. FO and weave in ends. 

    Attach holders to each intersection of chain and either dowel or ridge row. 

    Please feel free to sell the keychain holders you’ve made, but please credit Crafty Reason and link back to the pattern here if you do so. Please contact us at craftyreason@gmail.com for permission if you wish to reproduce this pattern. Also, send us a message if you notice anything wrong with the pattern. Happy crocheting!

    ~Crafty Reba

    Learn more about Crafty Reason at http://craftyreason.com/about-us/.

    This pattern is also available on Ravelry. You can purchase a PDF of the pattern there if you would like your own formatted copy.

    Pattern © Crafty Reason. Please Contact Us for permission if you wish to reproduce any of our patterns.

  • Pattern Variation: Large Crochet Flat Elephant

    A new customer asked me to make a larger flat elephant, along with a couple of regular smaller flat elephants following Ani Tugushi’s YouTube tutorial (pattern transcribed here), so I modified the original pattern to make a larger flat elephant. The small elephant (original pattern) measures 4×4”. The large elephant (made following this new modified pattern) measures 6×6”.

    Large Flat Elephant

    Terms/Abbreviations:

    Ch = Chain
    Sc = Single Crochet
    Inc = Increase (2 crochet stitches in 1 stitch space)
    Dec = Decrease (crochet 2 stitches together into 1 stitch)
    Rep = Repeat
    FO = Finish off

    You will need:

    100% cotton yarn in the color(2) of your choice
    4mm hook

    Pattern Notes:

    Chain 1 and turn at the end of each row. Start each row in the second stitch from hook. This includes the rows with chains at the end–make an additional chain from what is noted and start the next row in the second stitch from the hook.

    I used two colors and alternated sides and ears because I like the way it looks. The original pattern uses only one color for the whole elephant.

    Body Pattern:

    Make 2 in color(s) of your choice.

    Ch23
    R1: inc, sc 21 (23)
    R2: sc 22, inc (24)
    R3: inc, sc 23 (25)
    R4: sc 24, inc (26)
    R5: inc, sc 25 (27)
    R6: sc 26, inc (28)
    R7: inc, sc 27 (29)
    R8: sc 28, inc (30)
    R9-16: sc 24 (leave 6 sts) (24)
    R17: sc 24, ch 6 (30)
    R18-24: sc 30 (30)
    R25-28: sc 20 (leave 10 sts) (20)
    R29: dec, sc 16, ch 10 (27)
    R30: sc 25, dec (26)
    R31: dec, sc 24 (25)
    R32: sc 23, dec, FO (24)
    Leave a long tail for sewing on one.

    Ears Pattern:

    Make 2 in color(s) of your choice.

    Ch2
    R1: 3 sc in 2nd ch from hook (3)
    R2: inc 3x (6)
    R3: sc, inc* rep 2x (9)
    R4: sc 2 sts, inc* rep 2x (12)
    R5: sc 3 sts, inc* rep 2x, (15)
    R6: sc 4 sts, inc* rep 2x
    R7: sc 5 sts, inc” rep 2x
    Ears should be 3” each. Leave tails for sewing on both.

    Assembly:

    Weave in ends. Sew ears on around row 10. Fasten or embroider eyes around row 5. Sew body together, stuffing from top before closing. Make a small loop of thread with knot at end for tail.

    Size comparison with original flat elephants


    Please credit Ani Tugushi and link back to the tutorial on YouTube if you use this pattern. Feel free to also link to the written pattern here on Crafty Reason. Also, send us a message if you notice anything wrong with the pattern or if you would like a formatted PDF copy.

    Happy crocheting!

    ~Crafty Reba

  • Pattern: Round Cactus

    I searched off and on for over a year for a pattern for a small, round cactus that could be crochet in a spiral, rather than crocheting in rows and sewing together to get the “ridges” of the cacti. I couldn’t find one I liked, so I ended up making my own pattern instead.

    Round Cactus Pattern

    Terms/Abbreviations:
    MC: Magic circle
    Hdc: Half-double crochet
    Inc: Increase (2 stitches in 1 stitch)
    Dec: Decrease (1 stitch across 2 stitches)
    St: Stitch
    Sl st: Slip stitch
    BLO: Crochet in back loops only
    Rnd: Round
    FO: Finish off
    BO: Bind off

    You will need:
    Size F/3.75mm crochet hook
    Worsted weight yarn in the color of your choice (I used Red Heart Super Saver in Spring Green for the cactus)
    Worsted weight yarn for the dirt/sand (I used hand-me-down light brown/sandy-colored worsted weight yarn)
    Stuffing
    yarn needle
    scissors

    Pattern Notes:
    Be sure to turn your work inside-out so that the “ridges” of the hdcs show. (They will go around in a spiral, not up and down, but they still give it the overall cactus look and feel.)

    I use the invisible decrease method. You can find tutorials on YouTube, or you can use whatever decrease method you typically use.

    I did not close the bottom of my cactus. I wanted it to have a flat base with the edge of the final row that could be easily sewn to the “dirt/sand” underneath that I used to line the pot.

    I added a small flower to the top of my cactus. I used the Flower pattern found here:
    http://thecraftzilla.blogspot.com/2018/03/free-cactus-pattern.html?m=1
    I glued a small yellow button in the middle.

    The other cactus in the reference photo is based on this pattern: https://crobypatterns.com/crochet-cactus-in-the-pot-free-crochet-pattern/
    I modified the number of stitches in each row, and the number of rows, to make it fit in my dish.

    I’m also including a simple pattern for how I made the dirt/sand at the bottom of my dish.

    Cactus:
    In green, MC 8 sts (8)
    R2: hdc, inc around (12)
    R3: inc around (24)
    R4: (inc, hdc x 2) around (32)
    R5-7: hdc around (32)
    R8: (dec, hdx x 2) around (24)
    Turn work inside out.
    R9: (dec, hdc) around (16)
    Stuff lightly.
    R10: dec around (8)
    FO: sl st to first st in round and BO. Knot off end and hide inside ball.

    Dirt/Sand:
    In brown, MC 6 hdc sts (6)
    R2: inc around (12)
    R3: (hdc, inc) around (24)
    R4-?: (hdc x 2/3/4/etc., inc) around, increasing +1 hdc per row, until disc reaches desired size to fill bottom of dish
    Next Rnd: BLO hdc around
    Last Rnd: hdc around. 5 sts from end of rnd, sc x 3, sl st x 2
    FO, weave in end.

    Please feel free to sell the cacti you’ve made, but please credit Crafty Reason and link back to the pattern (http://craftyreason.com/2019/10/24/pattern-round-cactus/)‎ if you do so. Please contact us at craftyreason@gmail.com for permission if you wish to reproduce this pattern. Also, send us a message if you notice anything wrong with the pattern. Happy crocheting!
    ~Crafty Reba

    Learn more about Crafty Reason at http://craftyreason.com/about-us/.

    This pattern is also available on Ravelry. You can purchase a PDF of the pattern there if you would like your own formatted copy.

    Pattern © Crafty Reason. Please Contact Us for permission if you wish to reproduce any of our patterns.

  • Pattern: Sushi

    Recently we visited one of my college roommates and her toddler son. Having not been around little ones so much lately (at least, not that little), we were all pretty fascinated watching him play. He enjoyed stirring things (like my shoes!) in a pot with a big spoon. I remembered that Naomi loved play food when she was his age, and I remembered that she had (among the many usual plastic and wooden versions) a set of knit sushi that I loved. I believe they were made by one of our other very talented college roommates. When we returned home, I wanted to make a set of sushi for my friend’s son to play with. I found a great pattern here, but when I tried it out, I discovered that the sushis were way too small for a 15-month old–they were bite-sized and would be a choking hazard. So instead I made up my own sushi pattern for all my favorite kinds of sushi!

    These are a bit larger than real sushi so that they can be safe toys for toddlers.


    Sushi Pattern

    Terms/Abbreviations:

    Ch: Chain
    MC: Magic circle
    Sc: Single crochet
    Dc: Double crochet
    Inc: Increase (2 stitches in 1 stitch)
    Dec: Decrease (1 stitch across 2 stitches)
    BLO: Back loops only (crochet in the loops further away from you)
    St: Stitch
    Sk: Skip
    Sl st: Slip stitch
    Dec sl st: Decrease using slip stitches
    FO: Finish off
    BO: Bind off

    You will need:

    Size G/4mm crochet hook
    White yarn (rice)
    Black yarn (seaweed)
    Yellow yarn (tamago–egg)
    Pink/orange yarn (salmon)
    Dark pink yarn (tuna)
    Light green yarn (avocado)
    Dark green yarn (cucumber)
    Orange yarn (sweet potato)
    Purple yarn (molokai purple sweet potato)
    Stuffing
    White embroidery thread
    yarn needle
    scissors

    Pattern Notes:

    I use the invisible decrease method. You can find tutorials on YouTube, or you can use whatever decrease method you typically use.

    I used worsted weight scrap yarn. Using thicker or finer yarn will result in larger or smaller sushi.

    For the maki rolls, when switching colors, sometimes I would switch a stitch early or do an extra stitch in the round just to line everything up better. Also, when decreasing an uneven number of stitches, I end with a slip stitch to the first stitch, so I round down for the stitch count for that round.

    I didn’t switch back to the filling color at the end/bottom of the makis, just left it white, but if you wanted you could switch back to the filling color for R11 (shorter roll)/R12 (longer roll).

    For salmon nigiri, I used small stitches to embroider the diagonal white lines so that children won’t get their fingers wrapped in the thread. If making for older children (10 and up) or adults, you could probably just sew the thread at either end of the diagonal, which I think would look better.


    Rice Bases:

    Larger Rice Ball (shown with tamago)

    Using white yarn, MC 6 sts (6)
    R2: inc around (12)
    R3: (sc, inc) around (18)
    R4-14: sc around (18)
    Stuff lightly.
    R15: (dec, sc) around (12)
    R16: dec around (6)
    FO, sl st to close. Weave end over hole to close and hide inside.

    Small Rice Ball (shown with nigiris)

    Using white yarn, MC 6 sts (6)
    R2: inc around (12)
    R3-10: sc around (12)
    Stuff lightly.
    R11: (dec, sc) around (9)
    R12: dec around (4)
    FO, sl st to close. Weave end over hole to close and hide inside.


    Toppings:

    Tamago (egg omelet)

    Using yellow yarn, ch16 (16)
    R2: sk2ch, dc across (14)
    R3-4: Ch2, turn, dc across (14)
    FO, leaving a long tail to sew to rice.

    Seaweed wrap (shown with tamago)

    Using black yarn, ch25 (25)
    R2: sk1ch, sc across (24)
    R3: Ch1, turn, sc across (24)
    Do not BO. Leave long tail and sew ends together on underside of rice.

    Salmon nigiri

    Using pink/orange yarn, ch16 (16)
    R2: sk2ch, dc across (14)
    R3-4: Ch2, turn, dc across (14)
    FO, leaving a long tail to sew to rice.
    After sewing on, use embroidery thread and yarn needle to sew on diagonal white lines.

    Tuna nigiri

    Using dark pink yarn, ch10 (10)
    R2: sk1ch, inc, sc 8 across, ch1, turn (10)
    R3: sc 9 across, inc, ch1, turn (11)
    R4: inc, sc 10 across, ch1, turn (12)
    R5: sc 11 across, inc, ch1, turn (13)
    R6: inc, sc 12 across, ch1, turn (14)
    Turn work to crochet in shorter back side.
    R7: dec, sc 4 across, ch1, turn (5)
    R8: dec, sc 3 across, ch1, turn (4)
    R9: sc 2 across, dec (3)
    FO, leaving a long tail to sew to rice.


    Maki Rolls:

    Shorter roll

    Using desired color of yarn, MC 6 sts (6)
    R2: (inc, sc) around (9)
    R3: Switch to white. Inc around (18)
    R4: Switch to black. BLO sc around (18)
    R5-8: sc around (18)
    R9: BLO sc around (18)
    Stuff lightly.
    R10: Switch to white. Dec around (9)
    R11: dec sl st around (4)
    FO, sl st to close. Weave end over hole to close and flatten, and hide inside.

    Longer roll

    Using desired color of yarn, MC 6 sts (6)
    R2: (inc, sc) around (9)
    R3: Switch to white. Inc around (18)
    R4: Switch to black. BLO sc around (18)
    R5-9: sc around (18)
    R10: BLO sc around (18)
    Stuff lightly.
    R11: Switch to white. Dec around (9)
    R12: dec sl st around (4)
    FO, sl st to close. Weave end over hole to close and flatten, and hide inside.

    Please feel free to sell the sushi you’ve made, but please credit Crafty Reason and link back to the pattern (http://craftyreason.com/2019/08/22/pattern-sushi/) if you do so. Please contact us at craftyreason@gmail.com for permission if you wish to reproduce this pattern. Also, send us a message if you notice anything wrong with the pattern. Happy crocheting!

    ~Crafty Reba
    Learn more about Crafty Reason at http://craftyreason.com/about-us/

    This pattern is also available on Ravelry. You can purchase a PDF of the pattern there if you would like your own formatted copy.

    Pattern © Crafty Reason. Please Contact Us for permission if you wish to reproduce any of our patterns.

  • Pattern: Runner Baby Blanket

    This pattern and blanket combo is our second joint Crafty Reason project that Jason and I collaborated on. My friend from college wanted us to re-create her son’s baby blanket because he would get upset whenever his beloved blanket needed to be washed. She sent us pictures and told us the blanket was roughly shaped to fit on top of a twin bed. Jason used the pictures to figure out a pattern that would replicate the open, “hole-y” feel of the original blanket. Her son likes to be able to twine his fingers in and around the blanket, which he finds soothing.

    The original blanket


    I tried the pattern Jason came up with out a few times and modified it here and there to improve on the feel–my goal was to make it similar to my friend’s son’s, but not to try to be exactly the same, since that would be impossible. I also did the pattern writing as I went along, which I like to think I am improving at, but I know there’s still lots of room for improvement.

    One fun hitch along the way was that the variegated yarn we originally chose, which was really a great fit and looked quite similar to the original yarn, was discontinued about 1/3 of the way into the project, so we had to improvise. We found a solid color that matched one of the colors in the variegated yarn, and used that to frame the colorful print pattern.

    I’ve named this blanket the “Runner Baby Blanket” because the shape reminds me of a table runner. It’s quite long and thin. But I am really pleased with the blanket overall, and I am grateful to have had this opportunity to make a third blanket (the first was a nine-months-late birthday gift to my dad). I tend to prefer smaller, quick little projects, and I don’t have the patience for longer, larger projects, so this was a good challenge and good practice for me.

    Runner Baby Blanket Pattern

    Terms/Abbreviations:

    Ch: Chain
    Sc: Single crochet
    Hdc: Half double crochet
    Tr: Treble crochet
    St: Stitch
    Sk: Skip
    Sl st: Slip stitch
    Rep: Repeat
    FO: Finish off

    You will need:

    Size I-9/5.5mm crochet hook
    Yarn A (Red Heart Soft Multicolor: Watercolor *discontinued*), 2 balls
    Yarn B (Red Heart Soft: Seafoam), 2 balls
    Yarn C (light gray border), 1 small ball
    Yarn D (dark gray edge), small amount
    yarn needle
    scissors

    Pattern Notes:

    Foundation chain row will later be crocheted over to form the border.

    V stitches will be done into chains/holes created by Ch2 from the chain row.

    Post stitches go into stitches, not chain holes. I used the first stitch in post, looks kind of like the middle of the post, but as long as you’re consistent either stitch at the top of the post is fine.

    You will be doing a single crochet around each side of the V’s and around the posts.

    At the end of each row, your chain will become the squared edge of the blanket. You may need to chain more or fewer stitches, depending on how tight your gauge is, and you may choose to skip more or fewer stitches as well. You’ll want to chain as many as needed to make that square look, and skip as many as necessary to shape it correctly as the blanket grows.

    I did 33 V+Post rows (12 each in the solid Seafoam color, and 11 in the multicolor Watercolor print). Finished blanket measured 51” x 29” including borders, which are approximately 1” around. 

    Basic Interior Pattern:

    In Color B, chain to measure desired length not counting borders (for mine I went to 41”–it will stretch), make “Foundation Chain Row,” then alternate “Chain rows” and “V+Post rows” for 12 rows (you will use 1 ball of Seafoam yarn). Switch to Color A, alternate “Chain rows” and “V+Post rows” for 11 rows (you will use 2 balls of Watercolor yarn). Switch to Color B, alternate “Chain rows” and “V+Post rows” for 12 rows (you will use 1 ball of Seafoam yarn). End on chain row.

    If using only 1 interior yarn color, chain to measure desired length not counting borders (for mine I went to 41”–it will stretch), make “Foundation Chain Row,” then alternate “Chain rows” and “V+Post rows” until blanket is desired length not counting the border. End on chain row. 

    Foundation Chain Row:

    In 8th st from hook, sc, Ch2, Sc. *Ch4. Sk4. Sc. Ch4. Sk4. Sc, Ch2, sc. Rep from * until end of initial chain. Ch5, turn. You may need to add chain sts if your first V+Post row doesn’t end on a V, which I like for symmetry–the foundation chain row will be crocheted over later anyway by the border, so it’s ok if the chain needs lengthening or shortening after the fact.

    V+Post row:

    Make a V: In Ch2 sp from previous row, 2tr, sc around 2tr sts, 2tr, sc around 2tr sts.
    Ch1
    *Make a post: 2tr in sc at top of post in previous row, sc around 2tr sts.
    Ch1
    Make a V: In Ch1 sp from previous row, 2tr, sc around 2tr sts, 2tr, sc around 2tr sts.
    Ch1
    Rep from * to end of row. Ch3, sk2 (attach at end where it looks right), sc. Ch6, turn.

    Chain row:

    In space at the top of V from the previous row, sc, ch2, sc.
    *Ch4, sc into top of post (first stitch, looks like the middle stitch) in previous row, ch4, sc into top of V (space made by sc around the first side of the V) in previous row, ch2, sc into top of same V space made by chain in previous row, ch4, sc into top of post in previous row.
    Rep from * to end of row. Ch3, sc into last st in row,  turn.

    Border and Edge:

    Border is 1” around.
    R1: In Color C, sc around over foundation chain row and sides, lining up sts as much as possible and subtracting 1 st (ex. 3 sts over a ch4). I did this pretty loosely, because I found that the border curled easily. If you prefer a tighter, slightly wavy border, try for a 1:1 ratio of stitches. On short sides, I did 2 sts, then 1 st between the posts.
    R2-7: Hdc around, inc in the st before, on, and after corners. Sl st at end of each row. Switch to Color D.
    R8: Hdc around. FO, weave in ends.

    Please feel free to sell the blankets you’ve made, but please credit Crafty Reason and link back to the pattern (http://craftyreason.com/2019/07/10/pattern-runner-baby-blanket/) if you do so. Please contact us at craftyreason@gmail.com for permission if you wish to reproduce this pattern. Also, send us a message if you notice anything wrong with the pattern. Happy crocheting!

    ~Crafty Reba
    Learn more about Crafty Reason at http://craftyreason.com/about-us/

    This pattern is also available on Ravelry. You can purchase a PDF of the pattern there if you would like your own formatted copy.

    Pattern © Crafty Reason. Please Contact Us for permission if you wish to reproduce any of our patterns.