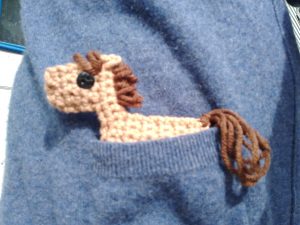
I work part-time at the ranch where my daughter and I ride horses, and I wanted to make a fellow ranch worker’s daughter a ragdoll horse for her third birthday. The original horse was a little bigger and not as floppy as I had hoped. I thought it would be cute if the horse were smaller, and the Pocket Pony was born!
Pattern: Pocket Pony (Crochet or Knit)
Written by Reba at Crafty Reason
http://craftyreason.com
Crochet Terms/Abbreviations:
Ch: Chain
Sc: Single crochet
Sl st: Slip stitch
FO: Finish off
You will need:
size G/4mm hook
I Love This Yarn! Toasted Almond
I Love This Yarn! Brown
Small amount of Fiberfill stuffing (or can use scrap yarn to stuff)
Black 10mm buttons or embroidery thread for eyes
yarn needle
Crochet Pattern Notes:
Watch my three-part video tutorial to follow along and crochet your Pocket Pony with me!
When sl st and turning without ch 1 (row 12), I lay the working yarn across the sl st before I do the first sc to hide the sl st.
In my video tutorial (video 1, 19:50), I made the sl st in the same st as the last st of the row, but I later changed the pattern slightly so the sl st is in its own st, so that count is a little different (12 sts in row 12, instead of 11). I hadn’t been counting the sts correctly in the video!
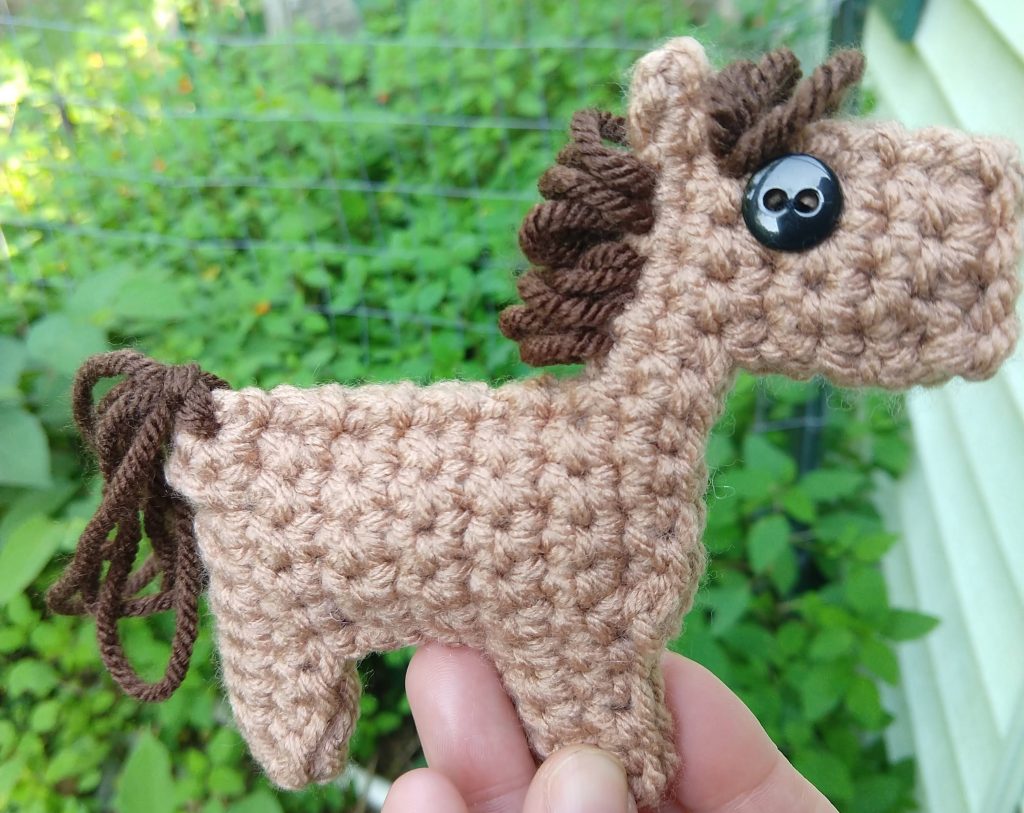
Finished pony is about 4” tall x 5” long (from nose to tail).
I’ve made several variations using different colors of yarn, different colored buttons for eyes, making the tails different thickness and lengths, and lengthening the ears.
Crochet Instructions:
Make 2. Leave a long tail for sewing on one.
Ch 11
R1-3: sc 10, ch1, turn (back leg) (10)
R4-7: sc 6, ch 1, turn (leave 4) (6)
R8: sc 6, ch 5, turn (front leg) (10)
R9-10: sc 10, ch 1, turn (10)
R11: sc 10, ch 9, turn (18)
R12: sc in 3rd ch from hook, sc 12, sl st, turn (leave 4) (do not ch 1) (12)
R13: sc 11, ch1, turn (leave 1/ear) (11)
R14-17: sc 4, ch1, turn (4)
R18: sc 4, FO (4)
Sew together along edge in running stitch, stuffing very lightly as you go. Do not sew ears, sew below them across its bottom (so there will be 2 ears). Sew on buttons or embroider eyes. Hide tails in body.
Loop technique for mane/tail
Watch my video tutorial for making the “loose loops” for the mane and tail.
I made 3 loops in one hole for the forelock.
I made 2-3 loops in each of the 6 holes down the back of the neck for the mane (make loops one in each hole going down neck, then one in each hole going back up neck). My mane loops are about ¼ – ½ inch long.
For the tail, I made 4 long loops in the same hole, about 2.5-3” long.
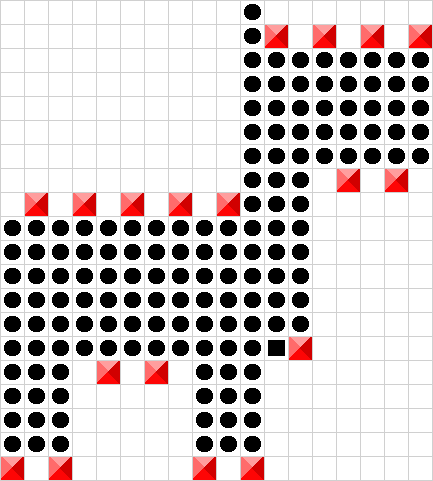
black dots = single crochet
black square = slip stitch
red squares = start row
Knit Pattern Notes
I made this knitting option for a knitter friend. Although I learned to knit long before I learned to crochet, I was never very good at knitting, and never learned how to read a pattern. So this pattern may be extremely clumsily written! A more experienced knitter may find better ways to both knit the pony and write the pattern.
The sewing, eyes, mane, and tail techniques are all the same for knit and crochet versions.
You Will Need
The same materials listed above, except I used size 10 bamboo knitting needles instead of the crochet hook. I’ve no idea if this is the right size for worsted weight yarn, but those are the only needles I have.
Knitting Instructions
Pony Side A:
CO 10
R1 (RS): Knit
R2 (WS): Purl
Rep Rows 1-2 for Rows 3-4.
R5: BO4, K5
R6: Purl
R7: Knit
R8: Purl
R9: CO 4, K10
R10: Purl
R11: Knit
R12: Purl
R13: BO4, K5
R14: CO8, BO1 (ear), P12
R15: B01 (chest), K11
R16: Purl
R17: BO7, K4
R18: Purl
R19: Knit
R20: Purl
R21: BO.
Pony Side B:
CO 10
R1: Purl
R2: Knot
Rows 3 and 4: Rep Rows 1 and 2.
R5: BO4, P5
R6: Knit
R7: Purl
R8: Knit
R9: CO4, P10
R10: Knit
R11: Purl
R12: Knit
R13: BO4, P5
R14: CO8, BO1 (ear), K12
R15: BO1 (chest), P11
R16: Knit
R17: BO6, P4
R18: Knit
R19: Purl
R20: Knit
R21: BO, leaving a long tail for sewing
Please feel free to sell the Pocket Pony you’ve made, but please credit Crafty Reason and link back to the pattern here if you do so. Please contact us at craftyreason@gmail.com for permission if you wish to reproduce this pattern. Also, send us a message if you notice anything wrong with the pattern. Happy crocheting and knitting!
~Crafty Reba
Learn more about Crafty Reason at http://craftyreason.com/about-us/
This pattern is also available on Ravelry. You can purchase a PDF of the pattern there if you would like your own formatted copy.
