Crafty Reason Crochet Patterns

  • Pattern Transcription: Flat Elephant

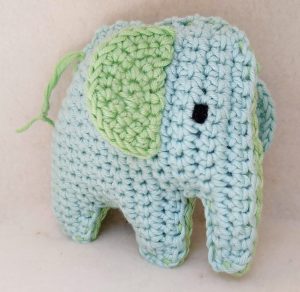
    I wanted to make a small “flat style” stuffed elephant. I saw one and thought it was so cute and different, and the natural squishyness of it seemed like a quality babies would really enjoy snuggling with. I searched everywhere, but the best sort-of pattern I could find was a video tutorial on YouTube. It was helpful, but slower to follow than just reading a pattern, so I transcribed it and am posting the transcription here. This is not a Crafty Reason original pattern, and I did not create it–it was posted here by Ani Tugushi. I made two modifications to Ani’s pattern: I embroidered the eyes rather than use safety eyes, since I wanted it to be safe for young babies, and I made it bi-color (green and blue) since I thought it looked even cuter that way.

    Flat Elephant

    Terms/Abbreviations:

    Ch: Chain
    Sc: Single crochet
    Inc: Increase (2 crochet stitches in 1 stitch space)
    Dec: Decrease (crochet 2 stitches together into 1 stitch)
    Rep: Repeat
    FO: Finish off

    You will need:

    Size G/4mm crochet hook
    100% cotton yarn in the color(s) of your choice
    embroidery thread in the color of your choice (for eyes)
    yarn needle
    scissors

    Pattern Notes:

    You will be crocheting in rows, making two halves and sewing them together.
    Chain 1 and turn at the end of each row. Start each row in the second stitch from hook.
    This includes the rows with chains at the end–make an additional chain from what is noted and start the next row in the second stitch from the hook.

    Body Pattern:

    Make 2 in color(s) of your choice.

    Ch15
    R1: inc, sc 13 (15)
    R2: sc 14, inc (16)
    R3: inc, sc 15 (17)
    R4: sc 16, inc (18)
    R5: inc, sc 17 (19)
    R6: sc 18, inc (20)
    R7-10: sc 16 (leave 4 sts) (16)
    R11: sc 16, ch 4 (20)
    R12-16: sc 20 (20)
    R17-18: sc 14 (leave 6 sts) (14)
    R19: sc 14, ch 6 (20)
    R20: sc 18, dec (19)
    R21: dec, sc 17 (18)
    R22: sc 16, dec, FO (17)
    Leave a long tail on one for sewing.

    Ears Pattern:

    Make 2 in color(s) of your choice.

    Ch2
    R1: 3 sc in 2nd ch from hook (3)
    R2: inc 3x (6)
    R3: sc, inc* rep 2x (9)
    R4: sc 2 sts, inc* rep 2x (12)
    R5: sc 3 sts, inc* rep 2x, FO (15)
    Leave long tails on both for sewing.

    Assembly:

    Weave in ends. Sew ears on at row 6, and fasten or embroider eyes at row 4, as shown in the video. I sewed the ears on the opposite colors. Sew body together, stuffing from top before closing. Make a small loop of thread with knot at end for tail. In the video Ani adds a bead to the tail, but I left that off since I didn’t want any small plastic elements to keep it safe for young babies.


    Please credit Ani Tugushi and link back to the tutorial on YouTube
    if you use this pattern. Feel free to also link to the written pattern here on Crafty Reason. Also, send us a message if you notice anything wrong with the pattern or if you would like a formatted PDF copy.

    Happy crocheting!

    ~Crafty Reba

    December 2019 update: We have shared our variations on this pattern to create a slightly larger flat elephant. The small elephant (this pattern) measures 4×4”. The large elephant (made following our new modified pattern) measures 6×6”.


  • Pattern: Purse-Style Cell Phone Cozy

    For her birthday, my sister asked for a cell phone cozy like the one I made for my parents, but she wanted hers to have a shoulder strap like a very small purse. So I modified my cell phone cozy pattern to have a more secure flap/button closure, with reinforced top sides and bottom to be able to support the weight of the phone from the shoulder strap, and adjusted the size to fit my sister’s iPhone 7 Plus.

    Cell Phone Cozy “Purse-Style”

    Terms/Abbreviations:

    Ch: Chain
    Sc: Single crochet
    Hdc: Half double crochet
    St: Stitch
    Beg: Beginning (first stitch)
    Sl st: Slip stitch
    FLO: Front loops only

    You will need:

    Sizes H/8mm and F/3.75mm crochet hooks
    Yarn A (bag)–worsted weight scrap yarn
    Yarn B (flap closure)–Red Heart Gumdrop yarn (https://www.redheart.com/yarn/gumdrop)
    Button (1 inch diameter)
    yarn needle
    scissors
    strap

    Pattern Notes:

    You will be crocheting in a continuous spiral–do not join with a slip stitch at the end of each row.

    Measure the device you’re making the cozy for when you make your starting chain, making sure you have an even number of stitches. You can decide whether to make it snug (sock-style) or looser (bag-style). For a purse-type cozy, I think bag style makes more sense because it will be easier to get the phone in and out of it.

    The button closure is especially helpful for the looser bag-style, but I use it for my snug sock-style cozy too. You’ll want to measure your button and size the buttonhole in the flap accordingly. You may need to chain and skip more or fewer stitches if your button is larger or smaller than 1”.

    My flap measured 3” long. You can do more or fewer rows depending on how long or short you want yours to be.

    Use a stitch marker at the end of each round if you want your color changes to line up. This is a great project for scrap yarn–I found it worked best to make 2-3 rows in each color, with one “accent” color that I did one row at a time in (see additional notes below on the accent color treatment).

    Crocheting in the Front Loops Only (FLO) refers to the loops closest to you. With hdc, I normally crochet in the two loops furthest away from me, creating a little rim on the inside of each row of my work. To create the slight definition in the accent row, I crochet in the two loops closest to me, leaving the loop furthest away from me empty to create the edging on the outside of my piece.

    For the strap, I used a leather strap recycled from an old purse, but you could also make a strap from yarn (braiding or crocheting) or fabric and tie on or attach with keychain rings, carabiners, etc. See instructions below for reinforcing the top sides if you’re worried about the phone being too heavy and pulling at the top stitches. If you plan to reinforce the top, be sure to do at least 3 rows of one color at the top/end, so that the reinforcements are virtually invisible from the outside.

    My pattern fits an iPhone 7 Plus. The finished cozy is 5.25 x 7”.

    Cozy Pattern:

    R1: With H hook using Yarn A, ch 44, sl st to beg. (44)

    R2-24: Hdc around, changing colors as frequently as desired. (44)

    If you’re making accent rows:
    R12 and R22: Using a different color yarn from others used, hdc FLO around. (22)

    Flap Pattern:


    R25: When your cozy has almost reached the desired height (when it is just above the top of your phone), attach Yarn B. With F hook, sc 22 sts across. Ch1 and turn. (22)

    R26-41: Sc 22 across, ch 1 and turn. (22)

    If you’re using the button closure:
    R42: To add your button hole, sc 9, ch4 and sk4, sc 9. FO and weave in end. (22)

    If you’re not using the button closure:
    R42: Sc 22 across, FO and weave in end. (22)

    I sewed my button onto the bag around row 18.

    Finishing:

    Optional: Reinforcing for shoulder strap
    After finishing flap, turn piece inside-out. Attach the top color yarn at each of the top side corners (one at a time) and do four single crochet stitches down the side, turn, skip a stitch, and do three slip stitches back up to top, crocheting over the attaching end.

    Bottom
    While piece is inside out, attach the bottom color yarn at one side of the bottom, and holding the bottom pieces together, single crochet them together. You may find it helpful to pin them together beforehand if you’re having trouble holding them straight and lined up. FO and weave in ends.

    Alternatively, you may whip stitch the bottom together, but I feel that crocheting will make for a stronger bottom, since it has to hold a relatively heavy phone.

    Please feel free to sell the cozies you’ve made, but please credit Crafty Reason and link back to the pattern here if you do so. Also, send us a message if you notice anything wrong with the pattern.

    This pattern is also available on Ravelry. You can purchase a PDF of the pattern there if you would like your own formatted copy.

    Happy crocheting!

    ~Crafty Reba

    Pattern (c) Crafty Reason. Please Contact Us for permission if you wish to reproduce any of our patterns.


  • Pattern: Cell Phone Cozy

    My parents recently got a new cell phone (finally!), and they asked me to make a case just like the one I made for their Kindle last year. I had followed a really cute pattern for the Kindle, but when I tried to translate it to cell-phone proportions, it just didn’t look as good to me. The little “dips” looked too busy with all the color changes I wanted to incorporate. So instead I made up a simpler pattern of my own.

    Cell Phone Cozy

    Terms/Abbreviations:

    Ch: Chain
    Hdc: Half Double Crochet
    St: Stitch
    Beg: Beginning (first stitch)

    You will need:

    Sizes H/8mm and G/4mm crochet hooks
    worsted weight scrap yarn
    button (optional)
    yarn needle
    scissors

    Pattern Notes:

    You will be crocheting in a continuous spiral–do not join with a slip stitch at the end of each row.
    Measure the device you’re making the cozy for when you make your starting chain, making sure you have an even number of stitches. You can decide whether to make it snug (sock-style) or looser (bag-style).
    The button closure is especially helpful for the looser bag-style, but I use it for my snug sock-style cozy too.
    Use a stitch marker at the end of each round if you want your color changes to line up. This is a great project for scrap yarn–I found it worked best to make 2-3 rows in each color, with one “main” color that I did 6  rows of.
    I added a flower behind the button, the pattern for which can be found here.
    I sewed the middle of some of the petals down so the flower didn’t stick out quite as much.
    My pattern fits a Samsung J3 2018. The finished cozy is 3.5 x 6″.
    I use this tutorial for the seamless join.

    Cozy Pattern:

    R1: With H hook, ch 26, leaving a long tail for sewing, sl st to beg. (26)
    R2-20: Hdc around, changing colors as frequently as desired. (26)
    When your cozy has almost reached the desired height (when it is just below the top of your phone), sew on your button if you’re using it, and switch to G hook. I sewed my button on around row 15, and I sewed the flower on first on that same row.
    If you’re using the button closure:
    R21: With G hook, hdc enough sts until you’re lined up with the button, then ch enough sts to make a loop to wrap around your button. On my cozy, I hdc 3 sts, then ch 25. Continue hdc in the next st (4th st in row on my cozy), hdc to end of row. (26)
    If you’re not using the button closure:
    R21: With G hook, hdc around. (26)
    Finish with the seamless join. Whip stitch the bottom closed.


    Please feel free to sell the cozies you’ve made, but please credit Crafty Reason and link back to the pattern here if you do so. Also, leave me a comment if you notice anything wrong with the pattern.

    ~Crafty Reba

    **New!! This pattern is now also available on Ravelry. You can purchase a PDF of the pattern there if you would like your own formatted copy.

    Pattern © Crafty Reason. Please Contact Us for permission if you wish to reproduce any of our patterns.

  • Pattern: Cozy Winter Hat

    This is a hat pattern I made up myself based on one of the first hats I ever made without a pattern, about 2 years ago when I learned to crochet. It’s super simple and works up really quickly. It’s also very easy to modify to fit specific heads.

    **New Years 2020 Update! I’ve added a Toddler size.**

    Cozy Winter Hat

    Terms/Abbreviations:

    Sc: Single Crochet
    Dc: Double Crochet
    St: Stitch
    Inc: Increase (2 sts in one stitch)
    Rep: Repeat
    FO: Fasten off
    Sl st: Slip stitch

    You will need:

    Size N/10mm crochet hook
    bulky yarn (I used Loops & Threads Charisma)
    yarn needle
    scissors

    Pattern Notes:

    I made this hat in four sizes: Kids Small/Medium (fits ages 5-9), Kids Medium/Large (fits ages 10-teen), Adult Regular, and Toddler (fits ages 2-4). The hats were measured to fit specific people’s heads, which were approximately 22″, 23″, and 24″ around. The new Toddler hat was guesstimated based on the average toddler head size of 20″. The hat is pretty stretchy, so the fit doesn’t have to be precise. The main pattern is for the Small/Medium size, with Medium/Large, Adult, and Toddler respectively following.
    I use this tutorial (https://www.youtube.com/watch?v=rdWgcR6nlWQ) for the seamless join.

    Hat:

    R1: Make a magic circle, Ch 2, 10 (12, 12, 8) dc in magic ring (10, 12, 12, 8)

    R2: Inc around (20, 24, 24, 16)

    R3: *Inc in first st, dc in next st*, rep from * around (30, 36, 36, 24)

    R4, SM/M: Dc in each st around (30)

    R4, M/LG: Inc in first st, dc in next 34 sts, inc in last st (40)

    R4, ADULT: *Inc in first st, dc in next 8 sts*, rep from * around (44)

    R4, T: *Inc in first st, dc in next 2 sts*, rep from * around (32)

    R5-11, SM/M, M/LG, ADULT: Dc in each st around. At the end of row 11, do 3 hdc sts. (30, 40, 44)

    R5-9, T: Dc in each st around. At the end of row 9, do 3 hdc sts. (32)

    R10, T: Sc in back loops only (32)

    R11, T: Sc in each st around. At the end, make a seamless join: cut yarn leaving a tail. Pull yarn up through last st, then weave around first st in row to make it look like a stitch. Weave in ends. (Alternatively, sl st to join, FO, and weave in ends.) 

    R12, SM/M, M/LG, ADULT: Sc in back loops only (30, 40, 44)

    R13-14, SM/M, M/LG, ADULT: Sc in each st around. At the end, make a seamless join: cut yarn leaving a tail. Pull yarn up through last st, then weave around first st in row to make it look like a stitch. Weave in ends. (Alternatively, sl st to join, FO, and weave in ends.)

    Add a pom-pom if desired. Note: In order for the pom-pom to sit near the top of the wearer’s head, you may need to attach it at a spot other than where the spiral begins. My toddler hat’s pom-pom sits slightly toward the back of the wearer’s head because I attached it right at the spiral, which doesn’t line up with the highest point on his head.


    Please feel free to sell the hats you’ve made, but please credit Crafty Reason and link back to the pattern here if you do so. Also, leave me a comment if you notice anything wrong with the pattern.

    ~Crafty Reba

    **New!! This pattern is now also available on Ravelry. You can purchase a PDF of the pattern there if you would like your own formatted copy, or click here to buy it now. 

    Pattern © Crafty Reason. Please Contact Us for permission if you wish to reproduce any of our patterns.

  • Pattern: Baby Holiday Hat with Pom-Pom

    My co-worker recently had a new baby. I wanted to make her a hat that would last through the winter, but my favorite baby hat pattern was for newborn-sized hats. I also wanted to do something a little more festive since she was born right around the holidays. So I made up this pattern to make a super cute hat in xmas colors.

    Holiday Hat with Pom-Pom, size 3-6 months

    Terms/Abbreviations:

    MC: Main Color yarn
    CC: Contrasting Color yarn
    Ch: Chain
    Dc: Double Crochet
    St: Stitch
    Inc: Increase (2 sc in one stitch)
    Sl st: Slip stitch
    Rep: Repeat
    FO: Fasten off

    You will need:

    Size H/4.5mm crochet hook
    yarn in main and contrasting colors for the hat (I used red and green worsted weight yarn)
    yarn for the pom-pom (I used white worsted weight)
    yarn needle
    scissors
    2.5″ diameter circle of cardboard

    Pattern Notes:

    You can find tutorials on YouTube for how to make a magic ring/circle and how to make a pom-pom. I also include written instructions in the pattern below for how I make them.
    You will be crocheting in rows and joining with a slip stitch at the end of each row.
    Leave a few inches long tail at the start to use for sewing the pom-pom onto the top.
    The slip stitch does not count as a stitch. The chain beginning each row does not count as a double crochet.
    My finished hat’s diameter was about 5.5″.

    Hat:

    R1: In MC, make a magic circle, Ch 2, 12 dc in magic ring, sl st to join, Ch 2 (12)
    R2: Inc in each st around, sl st to join, Ch 2 (24)
    R3: *Inc in first st, dc in next st*, rep from * around, sl st to join, Ch 2 (36)
    R4: *Inc in first st, dc in next 2 sts*, rep from * around, sl st to join, Ch 2 (48)
    R5: *Inc in first st, dc in next 3 sts*, rep from * around, sl st to join, Ch 2 (60)
    R6-10: Dc in each st around, sl st to join. Switch to CC, Ch 2 (60)
    R11: Dc in each st around, sl st to join, FO, weave in ends (60)

    Pom-Pom:

    Here is how I made the pom-pom. There are many different ways!
    Wrap pom-pom yarn about 100 times around a 2.5″ diameter circle of cardboard, leaving a long tail at the start.
    Slide the yarn off the cardboard, keeping the loops together. Very tightly tie a knot around the middle of the loops, leaving another long tail.
    Holding the loops together, cut the middle of the loops.
    Shake out the pom-pom, holding onto the long tails. Trim the ends of the pom-pom to the desired length.

    To attach the pom-pom, thread the pom-pom tails through the small opening at the top of the hat. Thread the long MC tail you started with at the top of the hat through the tied center of the pom-pom at the bottom and back down through the hole. Sew the pom-pom onto the hat from the inside using the MC tail. Thread the pom-pom tails through the stitches on the inside of the hat without going all the way through so you can’t see the stitches. I tied them all together since I know the hat will constantly be taken off by pulling on the pom-pom, so I wanted it to be attached extra well.

    Please feel free to sell the hats you’ve made, but please credit Crafty Reason and link back to the pattern here if you do so. Also, leave a comment if you notice anything wrong with the pattern.

    ~Crafty Reba

    **New!! This pattern is now also available on Ravelry. You can purchase a PDF of the pattern there if you would like your own formatted copy.

    Pattern © Crafty Reason. Please Contact Us for permission if you wish to reproduce any of our patterns.

  • Pattern: F-bomb

    A few months ago, I had a special and unique order for “F-bombs.” They are super cute, soft crochet stuffed “bombs” with a letter F on them.  I wasn’t able to find a pattern that matched closely enough to what was desired, so I made up a new one myself.

    F-bombs

    Terms/Abbreviations:

    MC: Main Color yarn
    CC: Contrasting Color yarn
    Ch: Chain
    Sc: Single Crochet
    Hdc: Half Double Crochet
    Dc: Double Crochet
    St: Stitch
    Sk: Skip
    inc – increase (2 sc in one stitch)
    dec – decrease (sc 2 together; see Pattern Notes)
    Sl st: Slip stitch
    Rep: Repeat
    FO: Fasten off

    You will need:

    Size G/4mm crochet hook
    yarn in “bomb” color (main) and “fuse” color (contrasting)
    toy stuffing
    yarn needle
    scissors
    felt
    embroidery thread and needle

    Pattern Notes:

    You can find tutorials on YouTube for how to make a magic ring/circle and how to whip stitch.
    You will be crocheting in spirals.
    When decreasing, I use the invisible decrease technique; you can find tutorials on YouTube for how to do this, or you can also just do a regular single crochet decrease.

    Bomb:

    MC:
    R1: 6 sc in magic ring (6)
    R2: Inc in each st around (12)
    R3: Sc 1, inc; rep 6 times (18)
    R4: Sc 2, inc; rep 6 times (24)
    R5: Sc 3, inc; rep 6 times (30)
    R6: Sc 4, inc; rep 6 times (36)
    R7 – 12: Sc around (36)
    R13: Sc 4, dec; rep 6 times (30)
    R14: Sc 3, dec; rep 6 times (24)
    R15: Sc 2, dec; rep 6 times (18)
    Stuff bauble firmly with toy stuffing.
    R16: Sc 1, dec; rep 6 times (12)
    R17: Dec 6 times (6)
    R18-21: Sc around (6)
    Sew top together to finish off. Join with starting tail, knot, and hide in bomb. Cut off excess tails.

    Fuse:

    CC:
    Ch 8, sl st into middle of top of bomb. Leave a long tail.
    Thread yarn through each stitch through to the end, knot and cut off with 1” extra length.

    Letter F:

    Cut a capital letter F out of a piece of felt of the color of your choice. Whip stitch it to the center of the bomb using the same color embroidery thread as the F. Join with starting tail, knot, and hide in bomb. Cut off excess tails.

    Please feel free to sell the F-bombs you’ve made, but please credit Crafty Reason and link back to the pattern here if you do so. Also, leave a comment if you notice anything wrong with the pattern.

    ~Crafty Reba

    **New!! This pattern is now also available on Ravelry. You can purchase a PDF of the pattern there if you would like your own formatted copy.

    Pattern © Crafty Reason. Please Contact Us for permission if you wish to reproduce any of our patterns.

  • Patterns: Large and Small Washcloths

    I recently had an order for a gift set for a new baby (thank you, Barbara!). The customer wanted an octopus and two washcloths. I wanted to make the washcloths out of 100% cotton yarn, but I wasn’t able to find any that would be soft enough for a baby. I finally found a cotton blend yarn, but then had trouble finding a pattern for a washcloth with this type of yarn, which is soft but thin. I ended up making up my own pattern, and made two sizes: large and small. They do take a while to crochet (especially the larger pattern), but I think they came out lovely!

    Cotton Blend Washcloths

    Terms/Abbreviations:

    MC: Main Color yarn
    CC: Contrasting Color yarn
    Ch: Chain
    Sc: Single Crochet
    St: Stitch
    Sk: Skip
    Sl st: Slip stitch
    Rep: Repeat
    FO: Fasten off

    Size Small Pattern (Bernat Softee Baby Cotton yarn–two colors):

    I used size G/6 (4mm) hook. The finished washcloth is 6 x 6″.

    MC:
    R1: Ch 25
    R2: *Sk, (sc, dc in next st); rep from * to end of row. Ch 1, turn. (24)
    R3-23: Rep row 2. Sl st to beg st at end of row 23.
    Sc all the way around the edge of the washcloth. FO.

    CC:
    Attach CC and crab stitch (reverse sc) all the way around the edge of the washcloth. Do not knot off; instead pull end through last st and weave in.

    Size Large Pattern (Bernat Softee Baby Cotton yarn–two colors):

    I used size G/6 (4mm) hook. The finished washcloth is 7.5 x 8″.

    MC:
    R1: Ch 33
    R2: *Sk, (sc, dc in next st); rep from * to end of row. Ch 1, turn. (32)
    R3-32: Rep row 2. Sl st to beg st at end of row 32.
    Sc all the way around the edge of the washcloth. FO.

    CC:
    Attach CC and crab stitch (reverse sc) all the way around the edge of the washcloth. Do not knot off; instead pull end through last st and weave in.

    This pattern was inspired by: https://forum.crochetville.com/topic/83411-oh-so-soft-baby-washcloths/

    Please feel free to sell the washcloths you’ve made, but please credit Crafty Reason and link back to the pattern here if you do so. Also, leave me a comment if you notice anything wrong with the pattern.

    ~Crafty Reba

    Pattern © Crafty Reason. Please Contact Us for permission if you wish to reproduce any of our patterns.

  • Pattern: Barefoot Sandals

    Yesterday I had fun modifying a pattern for an adult barefoot sandal into a child version to fit Naomi’s size 1 foot. I had posted a link to a group of patterns on our Facebook page the day before, and she had seen the article and asked me to make her a pair.

    The pattern called for using floss or thread, but Naomi asked for me to make hers out of her favorite pink worsted weight acrylic yarn, and although there were smaller patterns available, she really liked one particular style. So first I followed the pattern using the worsted-weight yarn, and saw how it fit her foot. Then I modified the pattern to make it fit her much better.

    I made a lot of notes on the original pattern, which can be found here. Eventually I decided to just write the steps out myself in a new pattern, since I was only keeping two heavily-modified steps from the original anyway.

    Barefoot Beach Sandals for Size 1 Foot

    Terms/Abbreviations:

    Sc: Single Crochet
    St: Stitch
    Ch: Chain
    Sl st: Slip stitch
    Sk: Skip
    Rep: Repeat
    FO: Fasten off

    Pattern (pink worsted weight yarn):

    I used size F/5 (3.75mm) hook.

    R1: 9 sc in magic circle. (9 sts)
    R2: Sl st to first st in circle and ch 4. In ea st around, (sc, ch 4). (9 loops)
    R3: Ch 1, sl st into first loop. (Ch 10, sk one loop, sc in next loop. Sc in next loop.). Rep 3 times, ending with sl st into first sc. (3 large loops)

    Toe loop:
    Ch 20. Sl st into 12th st from hook to make toe loop. FO and weave in end along chain.

    Ankle ties (2):
    At the left and right sides of the top loop, in the sc where the loop starts and ends, attach yarn via sl st and ch 25. Wrap yarn around hook and insert from the back/wrong side of the work to make the join less visible.  I also kept a long tail and crochet it along with the yarn for the first 5 sts or so, to make the join sturdier than if I had woven the end in. Knot off and trim or weave end in on chain. You will do this twice (one side and then the other). See pink arrows in picture below for reference of where to attach yarn for each tie.

    Pull magic circle tail so the center hole is as small as you want, then weave in end.

    Please feel free to sell the sandals you’ve made, but please credit Crafty Reason and link back to the pattern here if you do so. Also, leave me a comment if you notice anything wrong with the pattern.

    ~Crafty Reba

    Pattern © Crafty Reason. Please Contact Us for permission if you wish to reproduce any of our patterns.

  • Pattern: Pink Bear Lovey

    Today I finished making a pink bear lovey for my friend’s daughter. I tried three different patterns before I finally ended up loosely basing the design on one, but modifying it heavily, so I’m going to post the pattern I came up with here. Every pattern I tried yielded a cute animal head that could have easily been either a bear…or a pig, because of the pink yarn I used. I think pigs are cute, but my friend had specifically requested a pink bear! So I had to basically make up my own pattern to make sure it was at least a bit more obviously a bear than a pig.

    Pink Bear Lovey

    Terms/Abbreviations:

    Sc: Single Crochet
    Dc: Double Crochet
    St: Stitch
    Inc: Increase—2 sc in the same stitch
    Dec: Decrease—1 sc across two stitches. I use the invisible decrease method (you can easily find tutorials on YouTube).
    Ch: Chain
    Sl st: Slip stitch
    Sk: Skip
    FO: Fasten off

    You will need:

    Size G/4mm crochet hook (for bear)
    Size I/5.5mm crochet hook (for “blanket”)
    yarn in main (MC) and contrasting colors (CC) for the bear (head and ears/snout), lovey border, and circle (I used pink (MC) and beige (CC) worsted weight yarn)
    yarn for the lovey (I used Bernat Pipsqueak yarn in Tickled Pink)
    embroidery thread for the nose (I used brown)
    safety eyes (or you can use buttons, or embroider eyes if making for a baby or toddler–see Pattern Notes)
    yarn needle
    stuffing

    Pattern Notes:

    It is recommended that toys for babies and toddlers should not have plastic eyes, which could potentially become choking hazards if they are pulled loose. If your lovey will be used by someone under 2 years old, please embroider eyes using embroidery thread or yarn. For more information on these guidelines, please visit https://kidshealth.org/en/parents/safetoys-young.html .

    The head, nose, and ears are very loosely based on this pattern: http://www.sewrella.com/the-cuddliest-crochet-bear-lovey/.

    For my loveys, I make a small circle to attach the blanket and the head together in a neat way. I crochet the circle and sew it to the underside of the blanket and the underside of the head.

    Bear’s Head

    Using MC, work in a spiral in continuous rounds.

    R1: 8sc in magic circle (8)
    R2: inc around (16)
    R3: *1sc, inc* Repeat around (24)
    R4: *1sc in next two sts, inc* Repeat around (32)
    R5: *1sc in next three sts, inc* Repeat around (40)
    R6-13: sc in each st around (40)
    Attach safety eyes between rows 6 and 7, about 6 or 7 sts apart, if using. Otherwise, eyes can be embroidered or sewn on after bear head is stuffed.
    R14: *dec, sc in next three sts* Repeat around (32)
    R15: *dec, sc in next two sts* Repeat around (24)
    R16: *dec, sc in next st* Repeat around (16)
    R17: sc in each st around (16)
    R18: dec around (8).
    Sl st to join. Leave a long tail for sewing to “blanket.”
    Stuff lightly. (I used about 3 big palmfuls of stuffing.) Sew hole closed lightly before sewing to blanket.

    Bear’s Snout

    Using CC, work in a spiral in continuous rounds.

    R1: 6sc in magic circle (6)
    R2: inc around, sl st to join. FO leaving a long tail. (12)
    Using embroidery thread or yarn and a yarn needle, embroider nose and mouth in desired style onto snout before sewing the snout onto the head.
    Sew snout onto center of bear’s head, in between safety eyes. Top of snout should be around row 7 (middle of eyes).

    Bear’s Ears (make two)

    Using CC, work in a spiral in continuous rounds.

    R1: 4 sc in magic ring. (4)
    R2: inc around (8)
    R3: *sc, inc* Repeat around (12)
    R4-5: sc in each st around (12)
    R6: sl st the last round closed by squishing it flat (sts should line up)
    Finish off leaving a long tail and sew onto the body. Tops of bear’s ears should be around row 3.

    “Blanket”

    Using your choice of blanket yarn, work in rows. Make your starting chain as long as you want one side of the square or rectangle to be.

    R1: Ch 30 sts. Ch 1, turn.
    R2-3: Sc in ea st, ch 1 and turn at end of row.
    R4-18: Dc in ea st, ch 2 and turn at end of row.
    R19-20: Sc in ea st, ch 1 and turn at end of row. FO and weave in ends, or crochet border around edge.

    “Blanket” border

    R1: Sc in ea st around the edge.
    R2: Shell edging: ch1, sc in first st, *sk 1 st, 5 dc in next st, sk 1 st, 1 sc in next st. Rep from * around. FO and weave in ends.
    Shell technique can be found here: https://www.craftsy.com/crocheting/article/5-crochet-edges-you-should-know/

    Bottom Circle

    Using CC, work in a spiral in continuous rounds.

    R1: 6sc in magic circle (6)
    R2: inc around (12)
    R3: *1sc, inc* Repeat around (18)
    R4: *2sc, inc* Repeat around (24)
    FO end, tie to other tail and hide behind circle when it is sewn to blanket.

    Assembly

    Sew ears and snout to head. Sew head, blanket, and circle together. Pin in place before sewing to ensure the head is centered and facing the way you want.

    Please feel free to sell the lovey(s) you’ve made, but please credit Crafty Reason and link back to the pattern here if you do so. Also, leave me a comment if you notice anything wrong with the pattern–I am still getting used to writing patterns that other people need to follow.

    ~Crafty Reba

    **New!! This pattern is now also available on Ravelry. You can purchase a PDF of the pattern there if you would like your own formatted copy.

    Pattern © Crafty Reason. Please Contact Us for permission if you wish to reproduce any of our patterns.

  • Pattern: Apple Bookmark

    Earlier this month my daughter Naomi’s school had Teacher Appreciation Week. I volunteer weekly in Naomi’s art class, and I also help out her classroom teacher once a week with things like decorating her classroom, photocopying worksheets, and other small tasks to help things run smoothly. She really needed a better pencil sharpener, and she liked the small manual one I had given Naomi for her desk, so we got her one of those.

    Of course I also wanted to crochet her something. Naomi told me her teacher likes apple decorations, but I noticed that she already had a lot of those all over her desk, and I wanted to make her something useful. I searched around for a bookmark pattern that I liked, but couldn’t find anything quite right, so I decided to just make up my own.

    I wanted to share it here since school will be ending in a few weeks, in case anyone is looking for a small, simple, easy-to-make gift for their child’s teacher.

    Apple Bookmark

    Terms/Abbreviations:

    Sc: Single Crochet
    St: Stitch
    Inc: Increase—2 sc in the same stitch
    Dec: Decrease—1 sc across two stitches. I use the invisible decrease method (you can easily find tutorials on YouTube).
    Rep: Repeat
    Ch: Chain
    Sl st: Slip stitch
    FO: Fasten off

    You will need:

    size F/3.75mm hook
    yarn in three colors for the apple (MC), leaves (CC1), and stem (CC2) (I used red, green, and brown worsted weight yarn)
    yarn needle
    stuffing

    Apple (MC)

    Work in a spiral in continuous rounds
    R1: 6sc in magic circle (6 sts)
    R2: 2sc into each st (12 sts)
    R3: *inc, 1sc* Rep six times (18 sts)
    R4: *inc, 2sc* Rep six times (24 sts)
    R5-8: 1sc in each st around (24 sts)
    R9: *dec, 3sc* Rep six times (18 sts)
    Stuff firmly, but do not overstuff (see note below).
    R10: *dec, 1sc* Rep six times. (12 sts)
    R11: *dec around* Rep six times (6 sts)
    FO  and leave a long tail. Using the tail, thread a yarn needle and pull the yarn through the center of the apple from top to bottom and vice versa to make the indentations/apple shape. (Note: This did not work so well for my first apple—with less stuffing, the dents were much more visible.) Hide tails inside apple.

    Leaf (CC1) (make three or as many as desired)

    Ch 4. In the second ch from the hook, sl st. Sc in next ch (third st from hook). Sl st in next ch (fourth st from hook).
    FO and weave in ends. Leave a long tail for sewing to the apple and stem.
    Sew two leaves to top of apple. Sew or tie one leaf to end of stem. Hide tails of top leaves inside apple.

    Stem (CC2)

    Attach 3 strands of CC2 yarn of the desired length to the top of the apple. They should be long enough to hang out of both ends of a hardcover book. Braid them and attach a leaf at the bottom. Knot and trim ends evenly.

    Please feel free to sell the bookmarks you’ve made, but please credit Crafty Reason and link back to the pattern here if you do so. Also, leave a comment if you notice anything wrong with the pattern–I usually just quickly jot down patterns I make up, in case I want to make something again, so I am not used to writing patterns that other people need to follow. 🙂

    Last week when I was helping out Naomi’s teacher, she had me sharpen a whole box of pencils–I was glad she has the nice pencil sharpener now, but I wished I had gotten her a battery-operated sharpener!  I also noticed her new apple bookmark is on her desk as yet another apple decoration–but I’m just glad she likes it!

    ~Crafty Reba

    **New!! This pattern is now also available on Ravelry. You can purchase a PDF of the pattern there if you would like your own formatted copy.

    Pattern © Crafty Reason. Please Contact Us for permission if you wish to reproduce any of our patterns.